As discussed in post 46, I purchased the Auto Vox X2 rear view monitor system for my SLC after having tried two other systems. I think a less costly, better system might be available if you were savvy enough to design your own using hardware from the drone world. It seems drones these days are packing crazy high resolution cameras into tiny form factors ideal for this type of application – if you can figure out how to put it all together yourself.
I’m not quite that savvy so I was looking for a pre-packaged system. The systems using cameras connected via the traditional RCA cable just aren’t up to snuff. They’re low resolution, distorted, and have poor color saturation. You can use them to make out that there’s a car behind you, but beyond that there’s not much more it’s going to tell you.
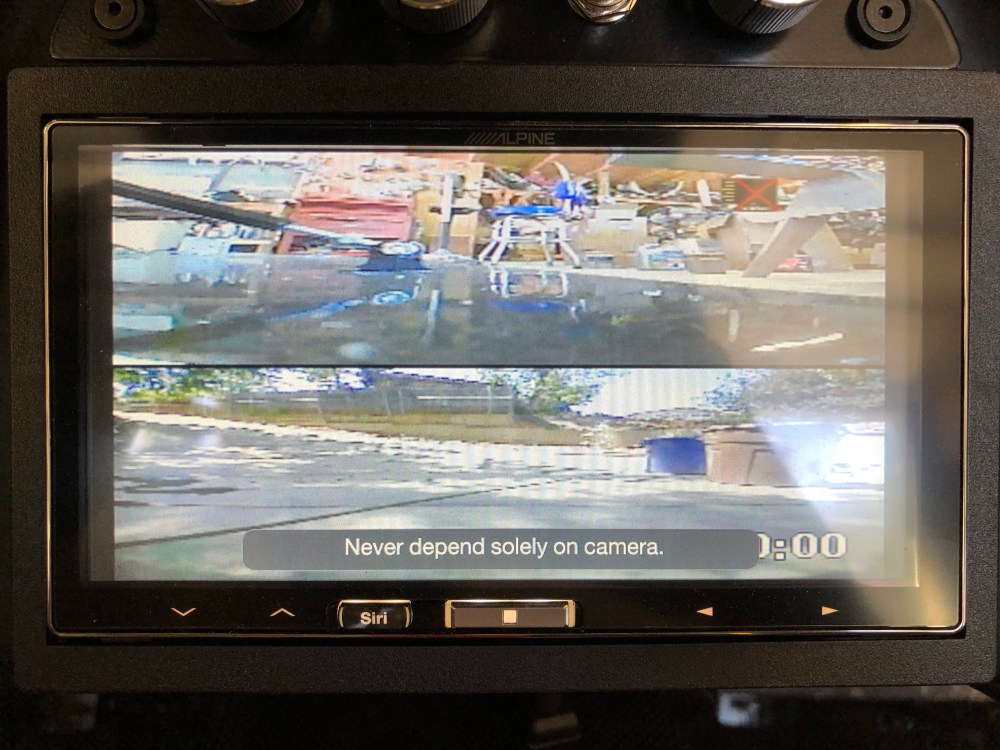
The Auto Vox X2 camera is higher resolution but I wouldn’t say it’s HD enough that it looks like you’re watching something on TV. The rear camera is 720p and it provides a clear enough picture; I’m happier with this than my prior purchases. The system is practical – the display isn’t actually 720p; it’s something more like 300-400 horizontal lines – so it’s only showing you a portion of what the rear camera sees at any one time. What this means is the image appears larger, making it easier to see details of whatever is behind you. In truth I think the amount it shows is plenty for a rear view camera.
Here’s a video of me playing with the monitor, switching between front and rear cameras, and showing how the image can be moved up and down. Hopefully the resolution is high enough through this website that it gives you an idea of what it looks like in person. The glare is pretty bad but I’ve still got the protective sticker on the monitor – though I am reconsidering my mounting orientation. I have it mounted mostly in line with the vehicle axis, with a very slight tilt toward the driver’s head; I think the glare and image quality would be improved if it were facing my eyeballs more directly.
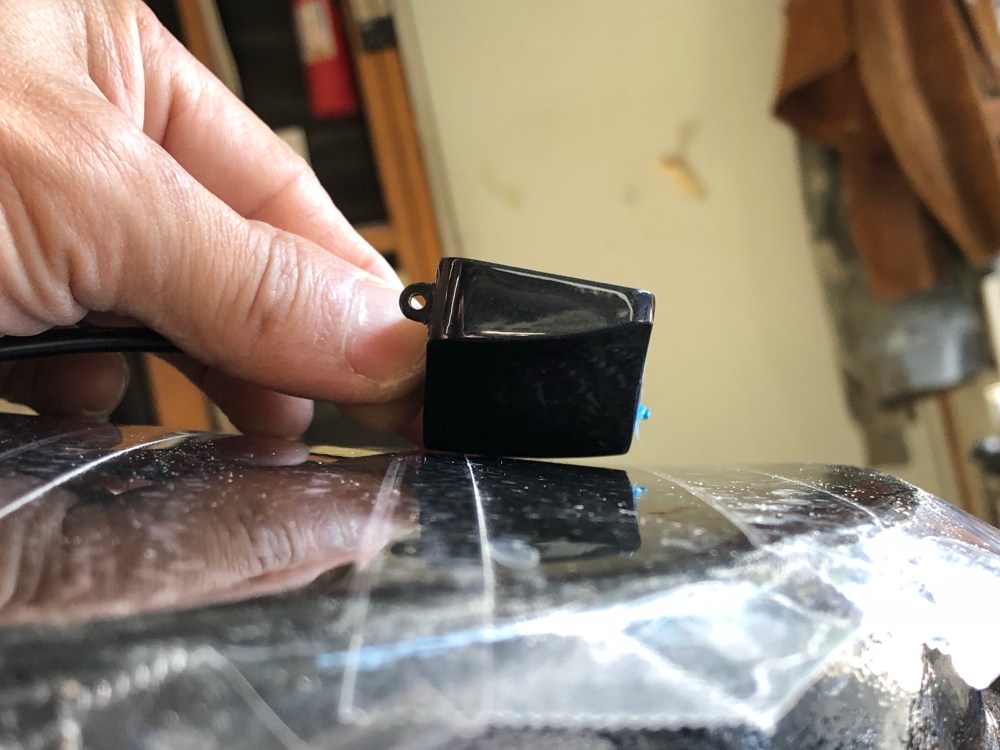
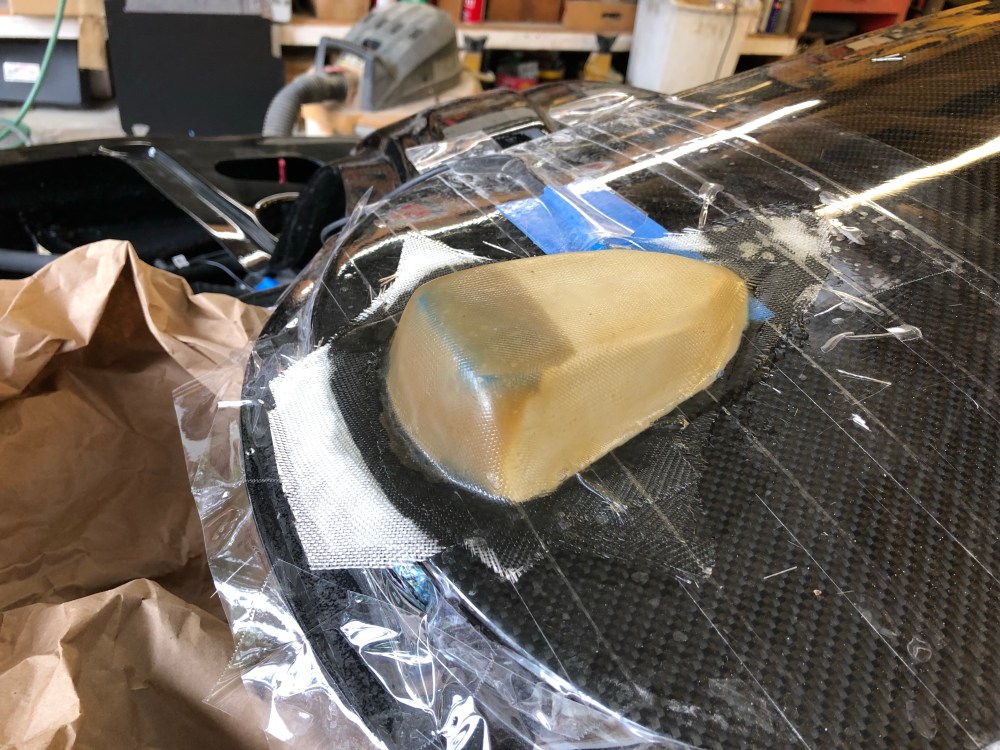
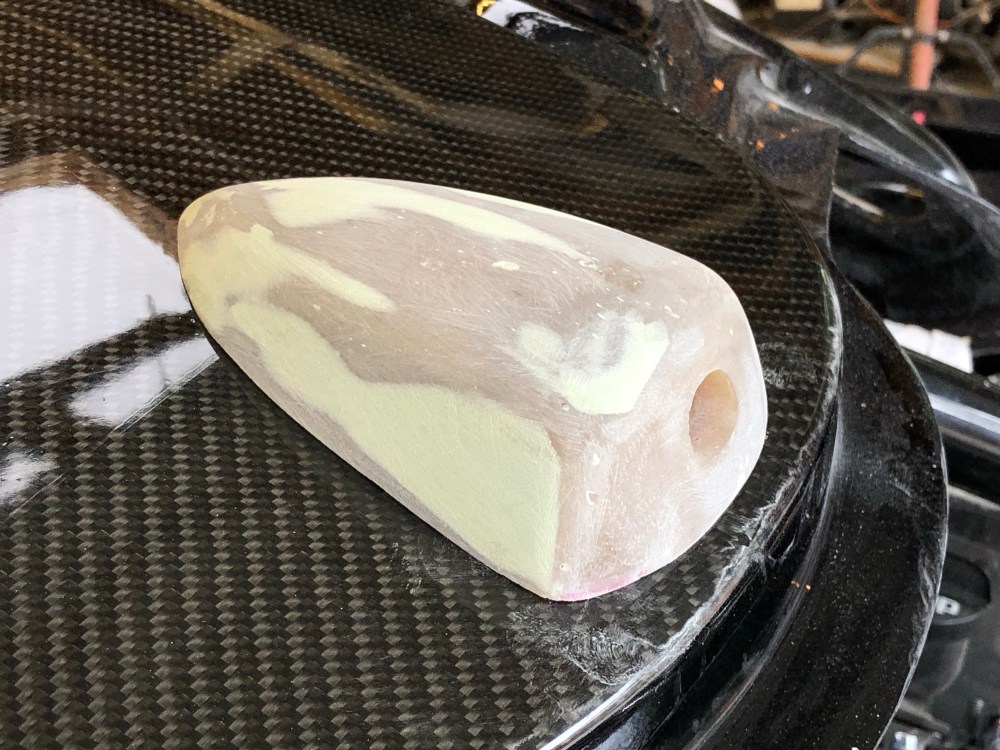
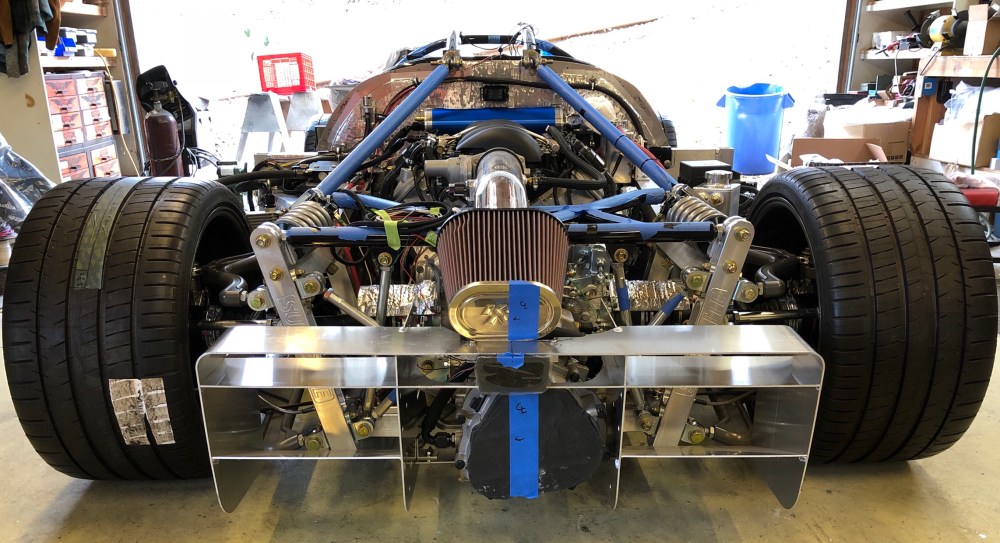
Mounting the camera proved to be a bit of a PITA. The camera has a fixed orientation and it can’t be manipulated via software. The flat side of the camera body wants to be mounted on the underside of a body panel – which is totally opposite of what you’d want if you were mounting it on the roof. This is my biggest gripe with the system – it would have been awesome if the camera could be rotated within the housing or if the image could be inverted via a menu setting. No such luck.
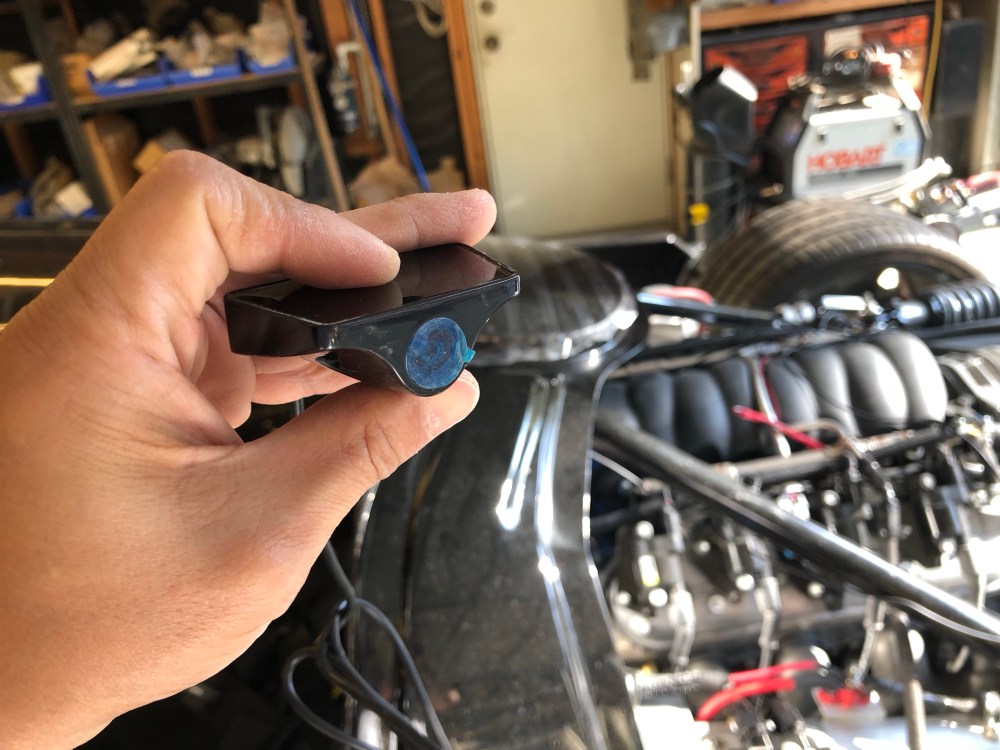
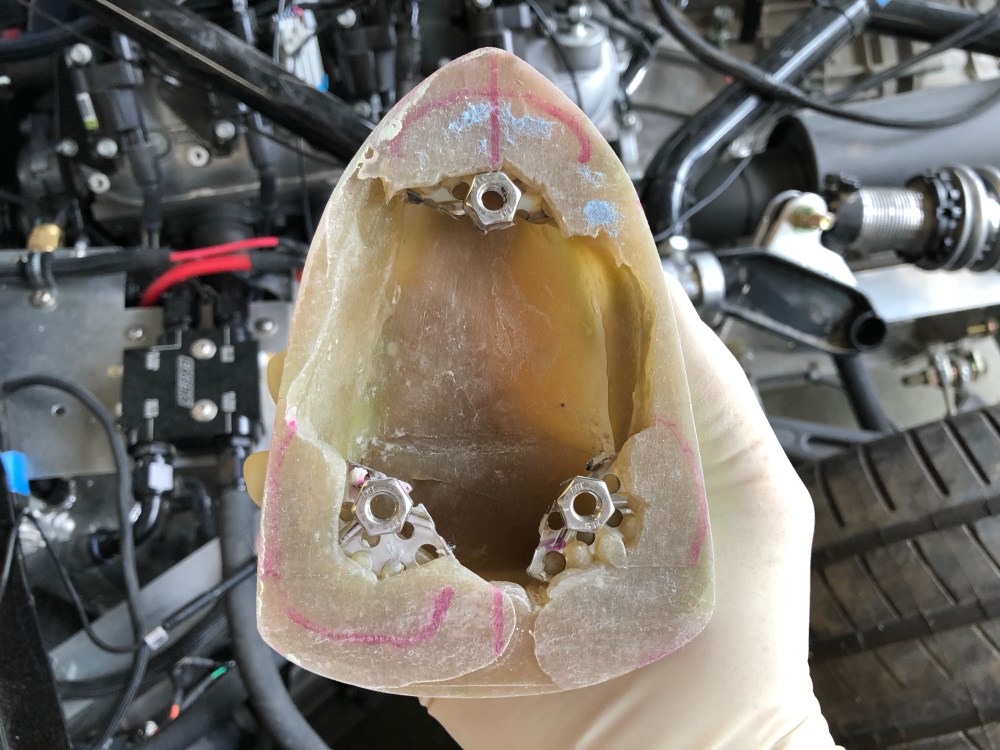
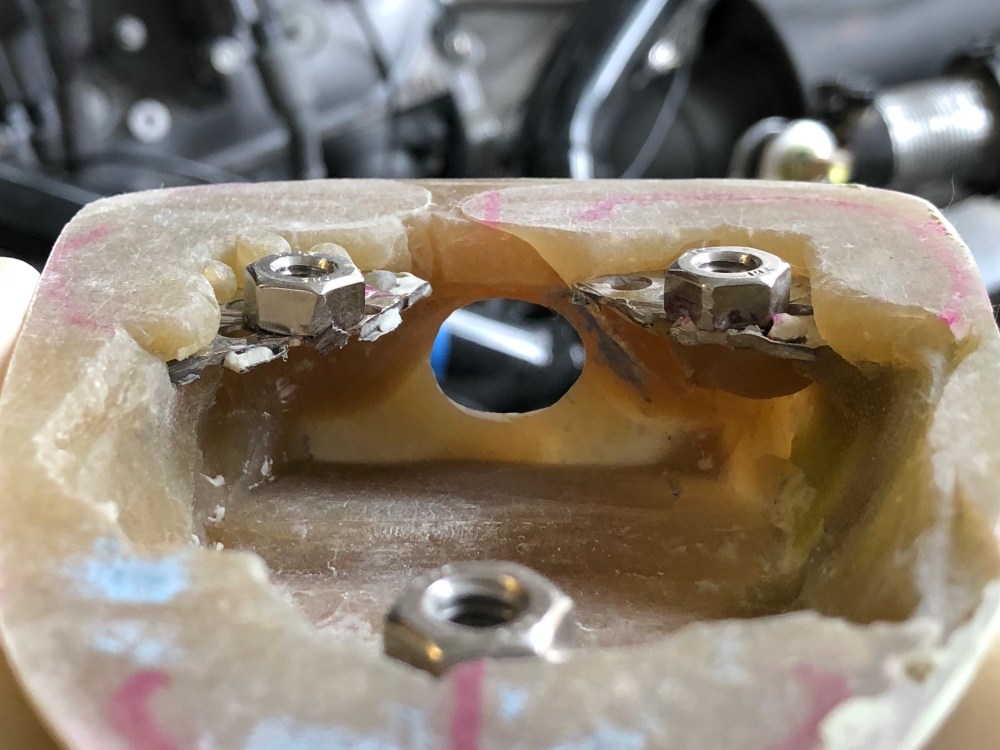
I looked at all the “shark fin housings” on eBay and didn’t come across anything I thought would be a sure winner. Instead of ordering one of each off eBay I decided to make my own.

It’s a really simplistic housing; if I had a better eye for industrial design or more glassing skills I’d attempt to make something a little more swoopy and cool looking. Instead, it’s function over form.


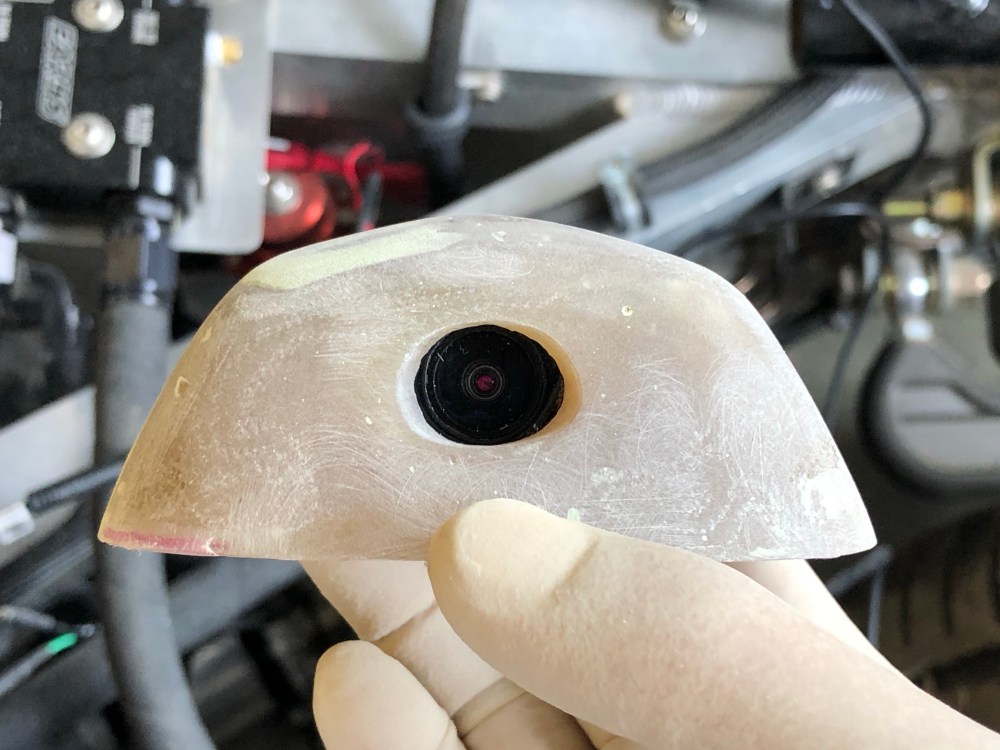
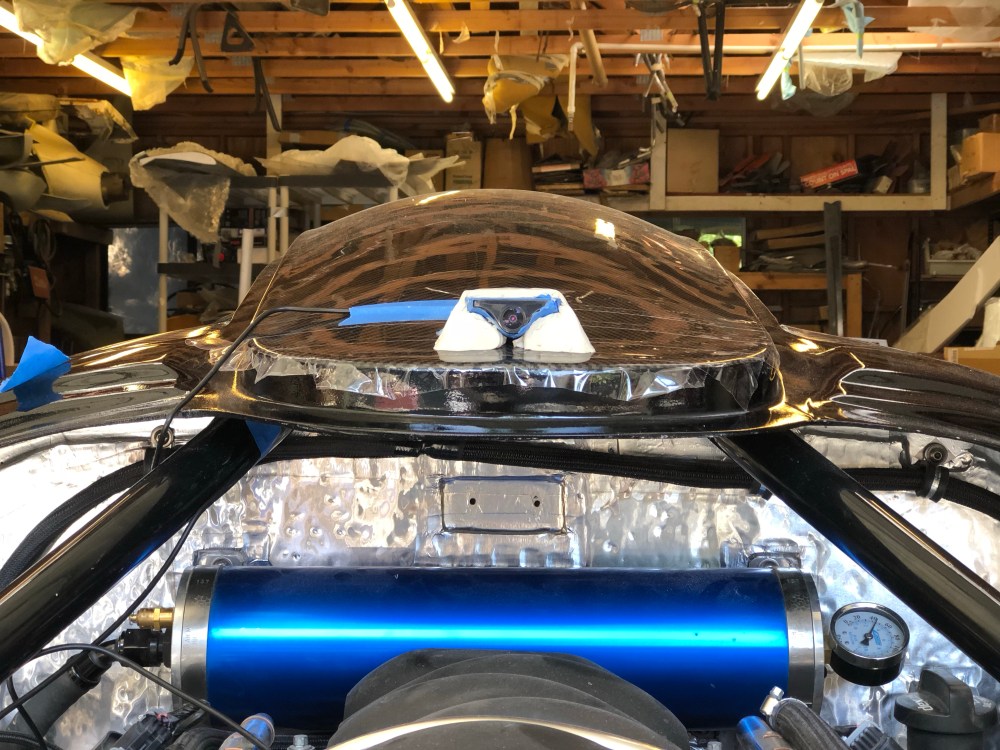
From this mounting position the camera has a wide enough view to see an object placed just behind and to the left or right of the car. So any car next to, and behind, the SLC should be visible. This still leaves the blind spot between the windows and rear wing – hopefully the side view mirrors will be enough to see anything there as a shoulder check won’t yield very much!
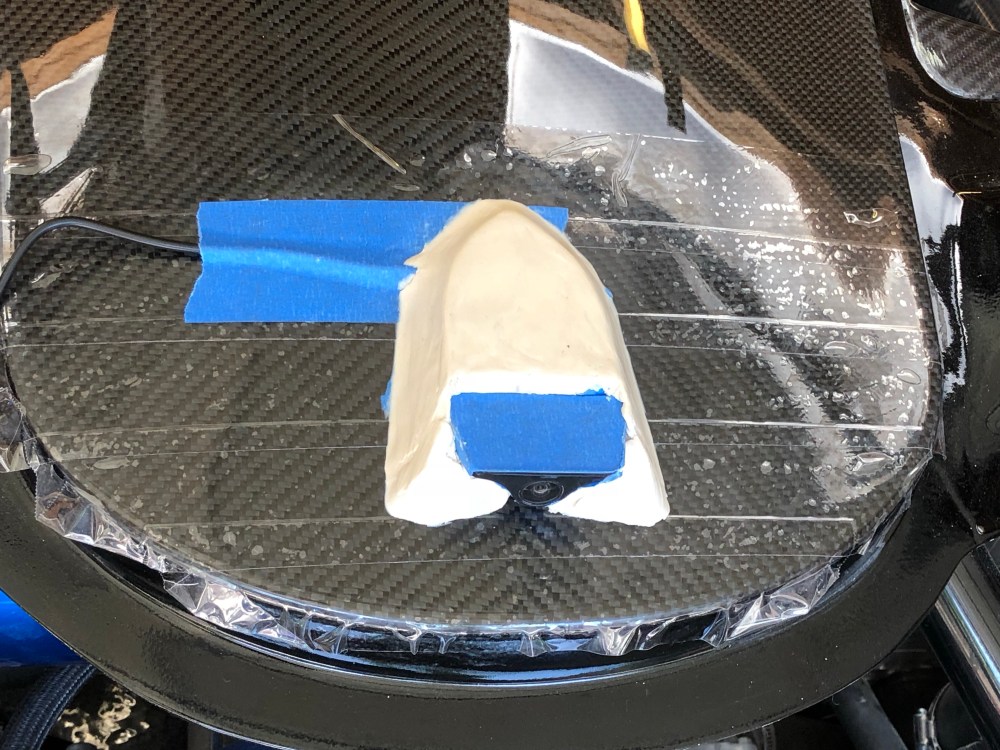
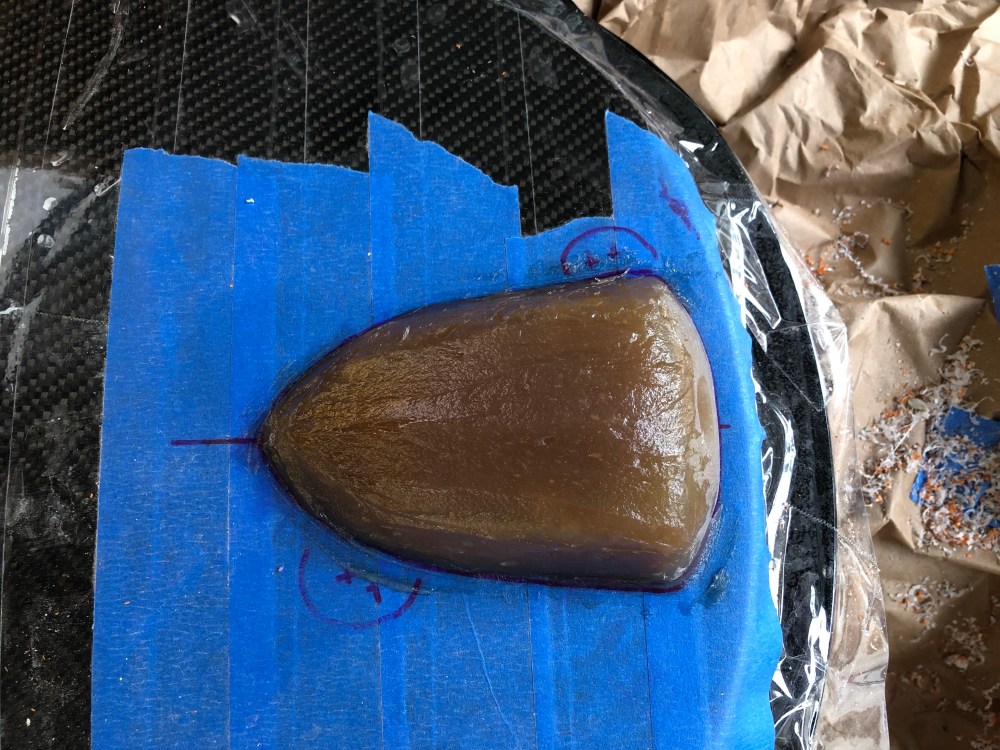
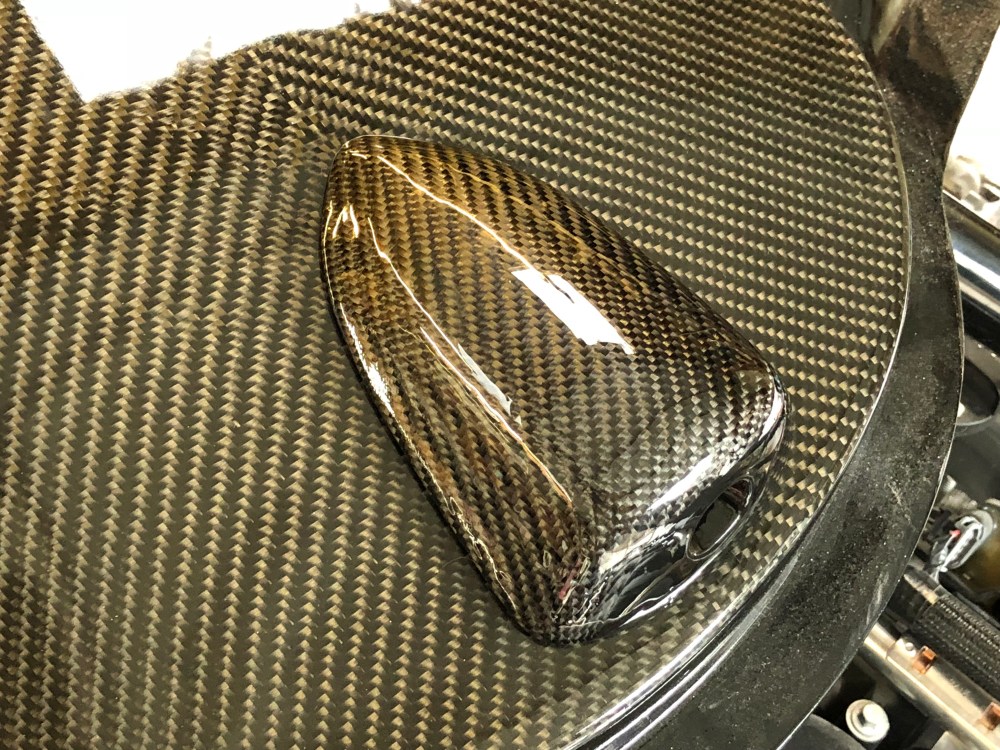
I had considered painting the camera housing gloss black but of course I opted for another approach …

I’ve been experimenting with the Weblock carbon fiber fabric from Composite Envisions and the fabric is pretty amazing at maintaining its weave while being super robust to handling. There are some minor drawbacks to the weave – it doesn’t look *quite* as nice as the standard weave, but it’s pretty darn good. The positive is you can handle it pretty harshly and the weave will stay intact, even if you have to bend it around extreme corners such as in the camera housing above. For this part, I had to make 2 extreme turns and bunch the fabric within very close proximity of each other. With a non-treated fabric this would have been impossible; with the Weblock I was able to get the fabric snug while not completely wrecking the weave.

Other details:
- As a pure dash cam it’s not up to snuff compared to its higher priced competition. I’m still working through my PTSD from having been in a fender bender a few years ago and my paranoia requires me to have a high quality dash cam mounted to all my cars from now on. There’s nothing more definitive than video evidence if you’re ever involved in an accident and it’s worth it to get a high quality dash cam. I would place the Auto Vox X2 at the lower end of the spectrum when it comes to its dash cam capabilities. The camera resolutions are fairly good but there’s no wifi support so you’ll need to remove the memory card if you need to pull any video – a PITA if you’ve hard mounted it as I’ve done. The cables are oriented such that you can’t pop the card out and work it out from between the headliner, the whole monitor needs to get dropped.
- There’s a parking mode which enables the cameras to record if it senses motion or a bump, but reviews are mixed. Some have reported their cameras don’t record anything when the car is bumped or the cameras record constantly until the battery is drained. I don’t plan to install a memory card or use the dash cam feature at all.
- When wiring the monitor, I wired it up to a switched +12V source. There’s some type of built-in battery as cutting power doesn’t delete any previous settings – I’m not sure how long the internal battery is good for. I used this hardware kit from Amazon to hardwire the system. I also purchased a 90-deg mini-USB to mini-USB adapter; there rear camera wire has a straight mini-USB connector. This puts the wire straight into your headliner – no bueno. Both the power connector and GPS wiring feature a 90-deg end, why they didn’t make the rear camera connector a 90-deg end as well is beyond me. On boot-up, the monitor brings up the front camera as a default. I’m not sure if there’s a setting to adjust so the rear camera becomes the default at startup.
- The monitor includes a GPS sensor. I located the sensor above the headliner – it can “see” through carbon fiber and fiberglass. The displayed date and time can be set automatically via GPS, pretty cool. There are other functions enabled by having the GPS connected – such as being able to display vehicle speed during video playback.
- There is an X1 model; I believe the only difference between the X1 and X2 are the monitor housings. The X1 has a silver colored housing whereas the X2 has a black housing. Supposedly the software in the X2 has been updated to address a few bugs noted in the X1 but I’ve read you can update X1s to the X2 firmware by contacting the company. The X1 is $10 cheaper than the X2.
As an FYI, I believe Allan used the Rydeen SV747HD in a recent build. It’s currently priced at a hefty $399 on Crutchfield but it looks to have a high resolution rear camera and it’s a lot easier to mount the Rydeen unit than the X2’s (no custom enclosure needed). I’m not sure if the image quality is any better than the X2 (they’re both 720p rear cams), and I’m not sure how the monitor displays the video feed (whether the image gets crushed vertically), but here’s another option for those wrestling with what rear view monitor/camera system to use.
Dashcam:
For dashcam duty I’m running a Blackvue DR650S-2ch-truck – this is their standard 1080p forward/720p rear system (from 2 years ago) but the rear camera was designed for use on trucks. That means the rear camera body is waterproof and meant to take abuse, designed to be mounted on the outside of a commercial vehicle. I had originally planned to mount the rear camera inside the engine bay …
What I discovered is that locating the camera inside the engine bay, mounted on the firewall wreaked havoc with the camera’s auto-focus/white balance logic. It was seeing the interior of the rear clam and out the center glass at the same time – but the extreme difference in lighting between the near- and far-field objects was giving the camera a tough time. I could usually only see the interior of the rear clam really well and things outside the glass were so brightened that nothing was distinguishable. So I had to come up with a new mounting place for the rear camera.

The Blackvue isn’t cheap but it’s designed specifically for dashcam work. The latest 750S upgrades the front camera to 60fps and the rear to a 1080p resolution. It’s the bee’s knees when it comes to dashcam systems. This is the only system I know of at this tier that includes an externally mounted rear camera.
What I like:
- Wi-fi – download any recordings to your phone using their app.
- Built in GPS
- Small form factor
- Externally mountable rear camera
- Rear camera has a trick IR system, makes for usable night recording
- Parking mode recording (impact detection)
- Water proof, high quality wiring for rear camera
- Compatible with BlackVue Over the Cloud – I’ll never use this, but for anyone who’s a real techie you can link your dashcam to a hotspot and have it push video to you if an event occurs. You can also track and view the camera remotely in case your vehicle gets stolen – What?!
I have it hardwired to my car using a Power Magic Pro – this ensures the unit won’t drain the battery to dangerous levels and deletes the stupid cigarette lighter adapter.
Front/rear parking cameras:
In my search for a suitable rear view monitor I had purchased the following cameras (they both use a standard RCA connector type plug):
In a nutshell, they both suck. This is definitely a case of “you get what you pay for” – and you’re not paying much. The Esky camera can only be used to view the rear unless your monitor can invert/mirror the provided video feed. There are no built in distance guide lines with this camera. By default, the TTP camera is shipped for use in the front position (the image isn’t mirrored). If you want to use the TTP camera as a rear camera, you clip one of the two wires and the camera automatically inverts the image before sending it to your monitor. There’s a second wire which, if clipped, will overlay distance guide markers.
Neither of these cameras provides a high enough resolution that I would recommend using them as your primary camera for seeing behind you in an SLC.
Instead of tossing these cameras I’ve incorporated them into a video system I plan to use when parking the car.
The Alpine iLX-107 head unit can display a single video feed (via RCA cable). When set as the “rear camera”, feeding a +12V signal to the display’s reverse sensing wire overrides the display and brings up the camera feed. I have a toggle switch inside the car that I’ll flip when I’m inching the car forwards or backwards to park – don’t want to smash that front splitter or rear diffuser into a concrete parking bumper! I have the Esky camera positioned at the rear of the car and angled downward. The TTP camera is mounted to the front splitter and has the forward edge of the splitter in view.
But how does the Alpine unit know if I want to see the front or rear camera if it only has 1 RCA plug? Answer – I want both!
To get both the front and rear image to display I purchased a 360-deg recorder/combiner thingy from eBay**. This device can take up to 4 separate video feeds and combine them into a single image before sending it out via an RCA cable. The unit actually has a fair number of features – none of which I plan to use (DVR, parking mode, video playback, etc). The combined image puts the front camera in the upper half of the Alpine display and the rear camera in the lower half. This squishes the images but there’s a button you can push to cycle through the cameras individually – so if you’re pulling forward into a spot and the squished image isn’t good enough, just push the button and that camera goes to full size – no worries about ramming your front splitter into a parking bumper. These cameras are only meant to stop me from flat out running into something so getting a high resolution image isn’t all that important.

There are 3 forward facing and 3 rear facing cameras on this car.
Paranoid? Maybe.
**Update: yeah, so after my first 20 mile round trip my recorder/combiner thingy from eBay is on the fritz. Mmmyeah … so don’t buy one!
