As if I haven’t already talked enough about carbon and my obsession with it, here’s another post dedicated to the subject (it’s basically what I’ve been working on for the past 2 weeks).
Carbon. It’s #6 on the Periodic Table of Elements. It adorns in the form of diamonds and in patches of woven strands of fiber. I’m talking about the latter in this post.
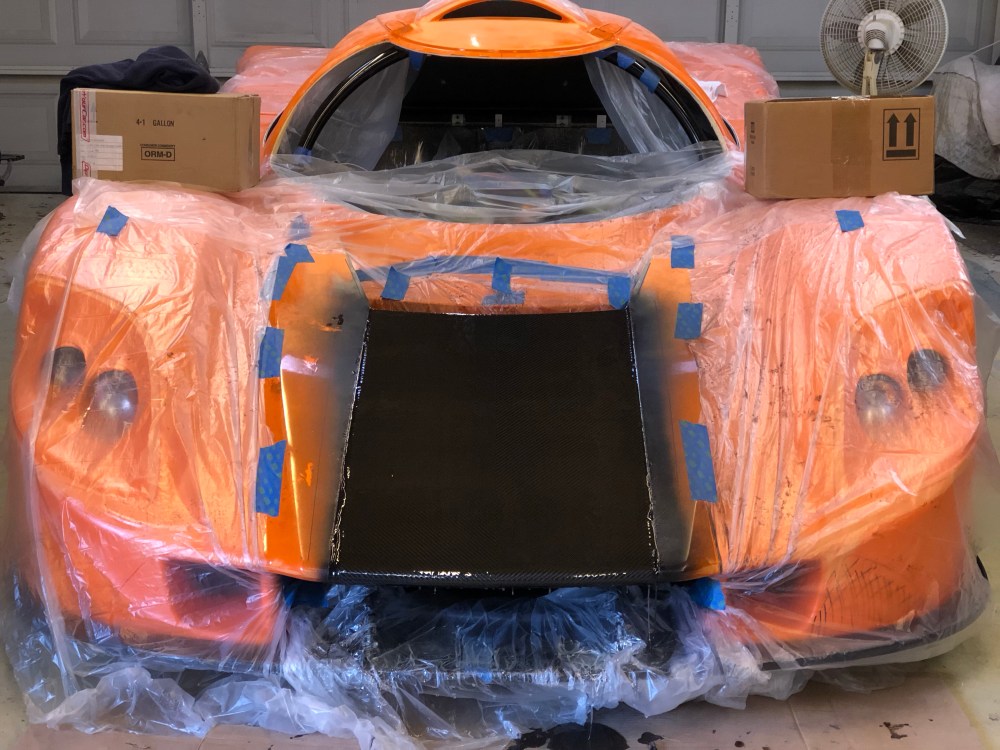
I’ll admit to having gone a bit nuts-o when I ordered my kit and went with the carbon option on just about everything. I passed on the carbon splitter and side skirts figuring they would get damaged and need to be replaced over time since this is primarily a street car – maybe the side skirts would’ve been OK. I ordered the carbon front fender vents but ultimately decided to pass on installing them because I didn’t think I’d be able to get them opened up and installed in a way that didn’t look completely hacked up. The vents have a very short profile and I was pretty sure I’d tear them up pretty badly trying to get a Dremel tool in there to open each pocket. What we’re left with is the tub, the rear wing, and the engine compartment louvers.
The carbon wing was a no brainer; a costly upgrade but the craftmanship is exceptional and it appealed to my engineering “gotta be functional” side – it generates more downforce than the fiberglass piece, is lighter, and as I said, is damn sexy to boot.
Ditto the engine compartment louvers. More airflow for the engine bay and a really nice visual addition to the rear engine cover.
Given a choice between the fiberglass and carbon tub it’s a bit of a toss-up. Knowing what I know now, I probably would’ve opted for the fiberglass tub and I’d attempt to skin it in carbon, as I did with my center console. It would be a super difficult thing to do cleanly – but would give me the most options in terms of tub modification. I also prefer the wet carbon look over the dry.
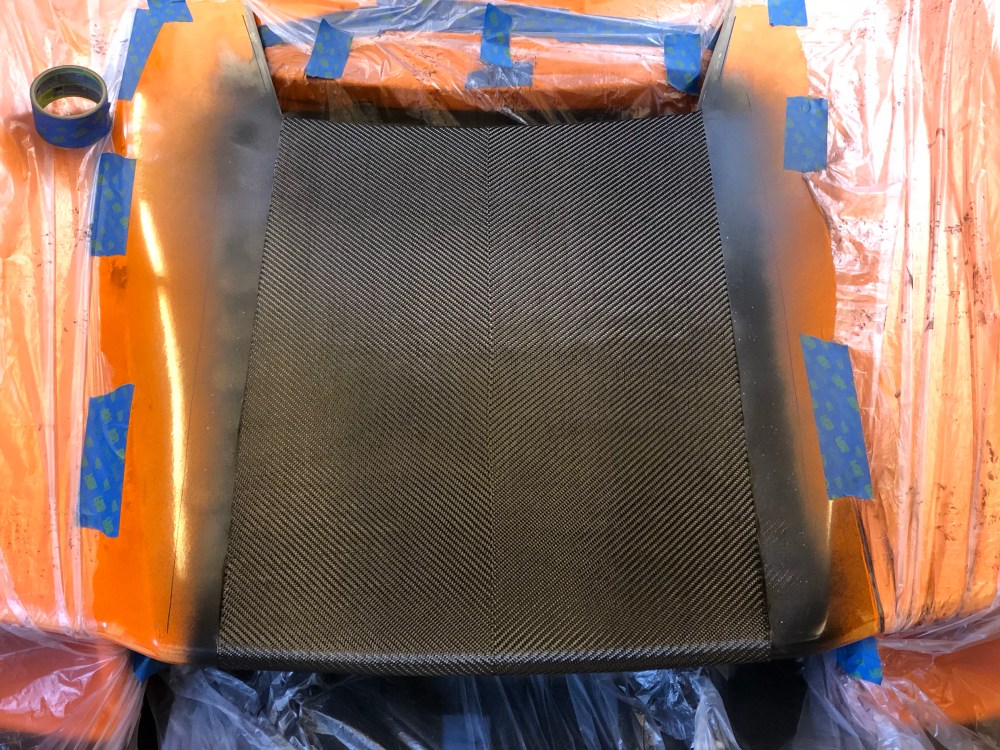
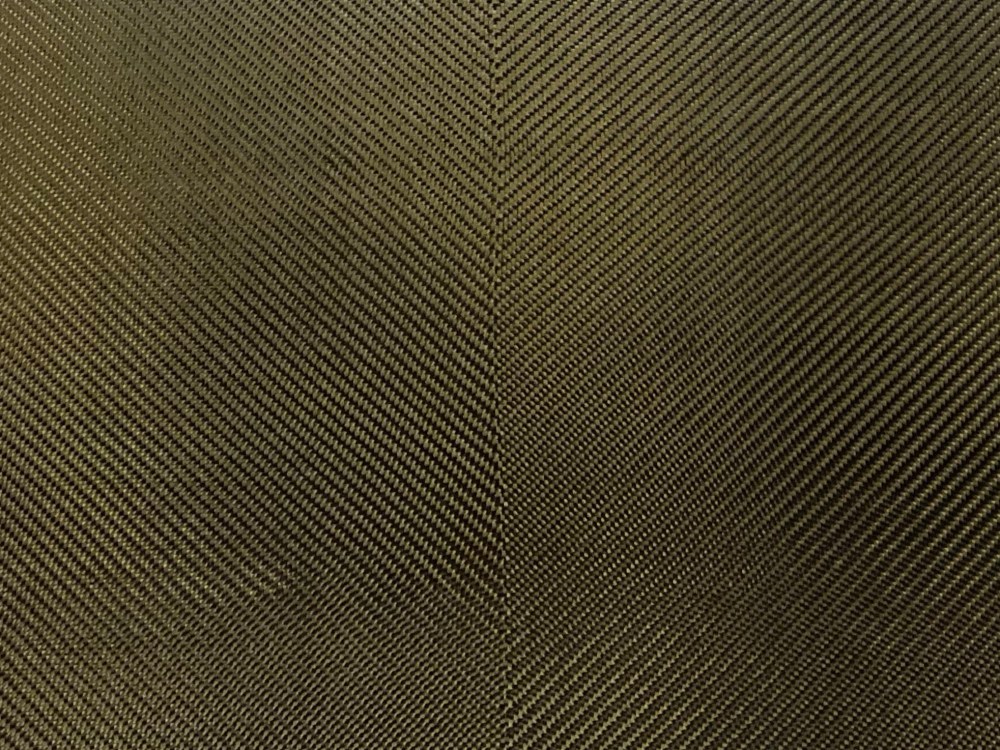
That said, the carbon tub IS pretty nice if you’re not actively looking for defects (they’re there, but you have to want to find them). The manufacturer did a pretty good job of orienting the carbon pieces used on each section; the weave is symmetric/mirrored between the passenger and driver sides. Down the middle, the weave is oriented left to right. It would be a tremendous amount of work to skin the tub but doing so would allow you to cut it up, modify, shape as necessary, and STILL have a carbon tub at the end of the day (albeit at a huge time investment). With the factory carbon tub you have to be exceptionally careful about how you cut it and you really can’t modify it without ruining the look you just paid beaucoup bucks for. Maybe a few more thoughts on this once the build is complete and I’ve had a chance to really evaluate the tub. As it is, it’s a good option if you’re time limited and want the carbon look (and who doesn’t, right?!)
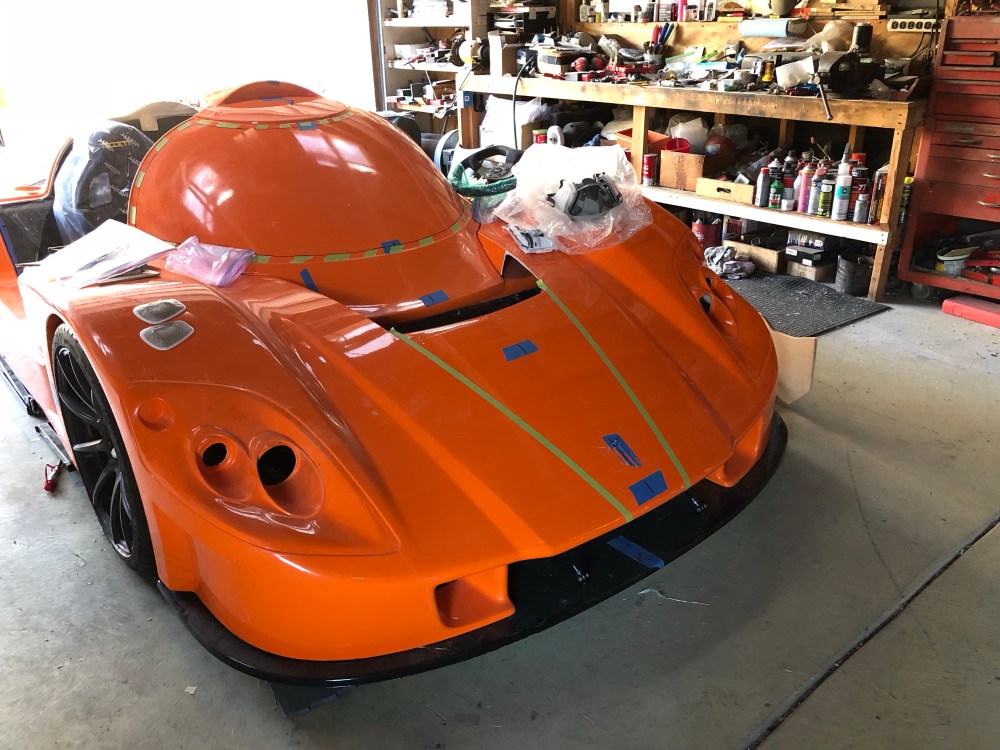
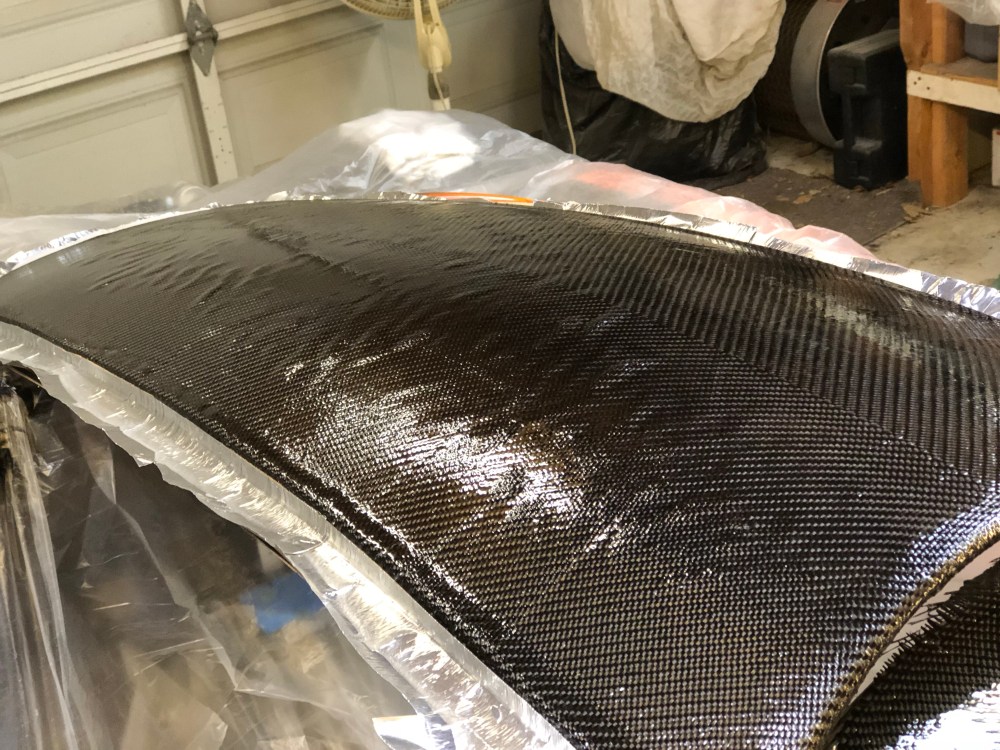
I really like the mirrored symmetric weave effect in the tub and I’ve been mulling over the rest of the car’s aesthetics. Something about the front end didn’t quite feel right to me. After thinking about it, it struck me that the front hood acreage is really large. The semi-pointed “nose” helps break it up, but I think it needs more. And that’s where the carbon comes in.
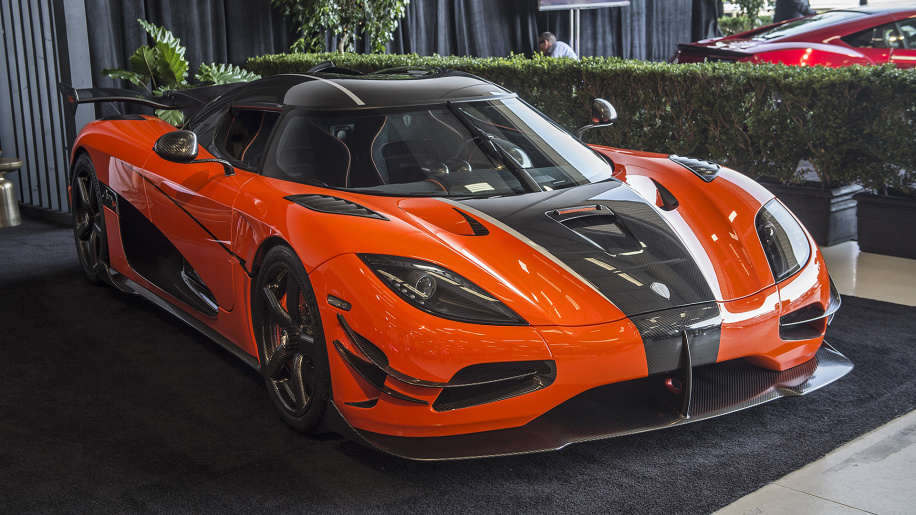
I believe the Koenigsegg cars are some of the most exotic and beautiful in the world. In particular, the orange Agera is just bananas. So using these …
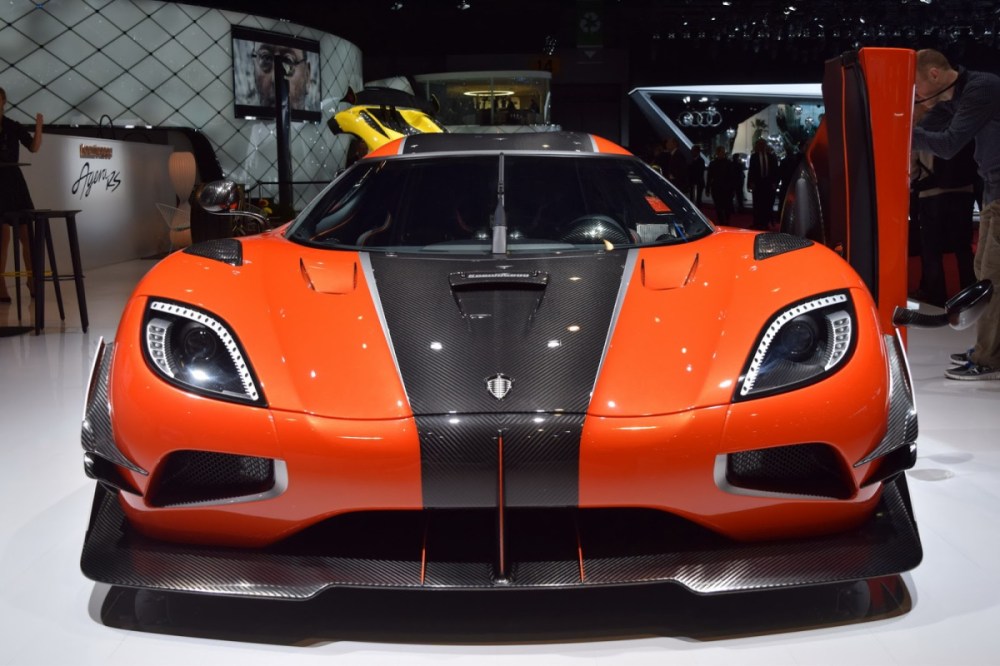
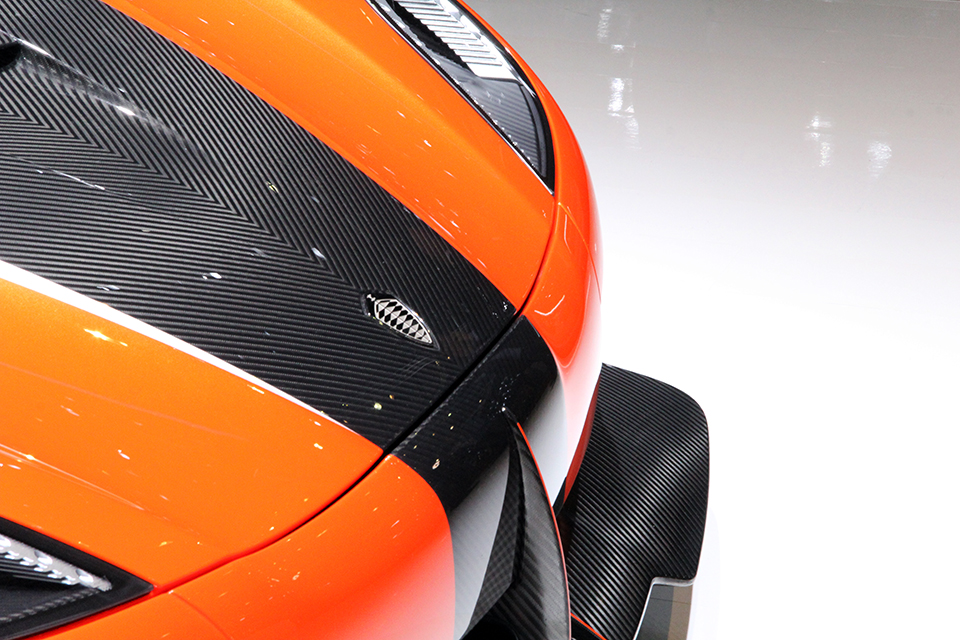
… and these …

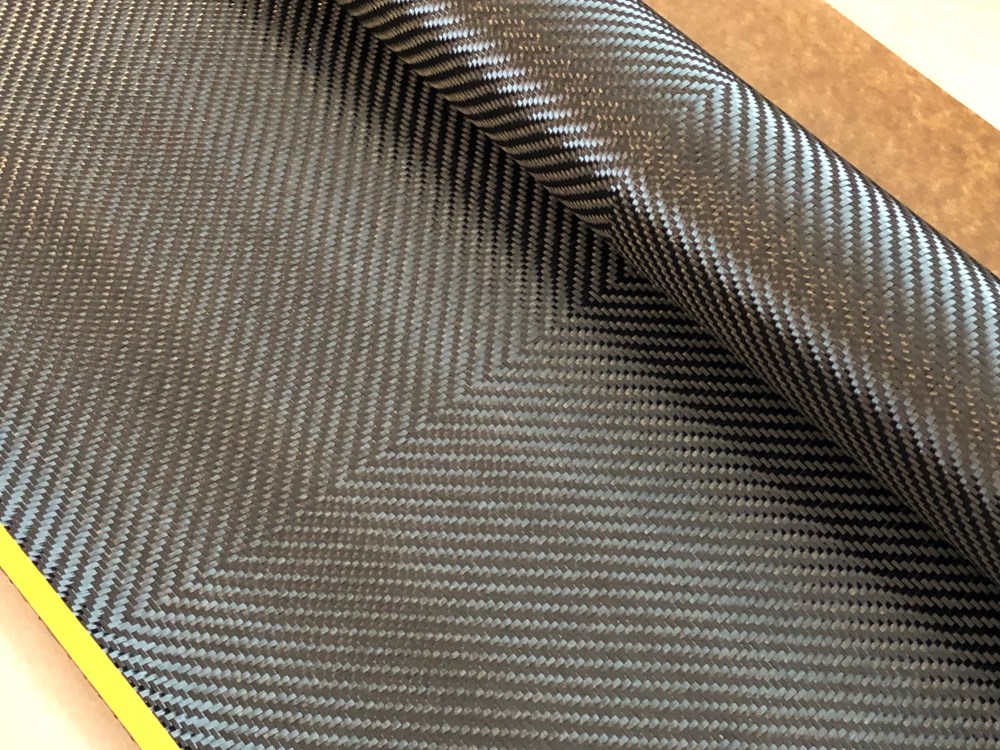
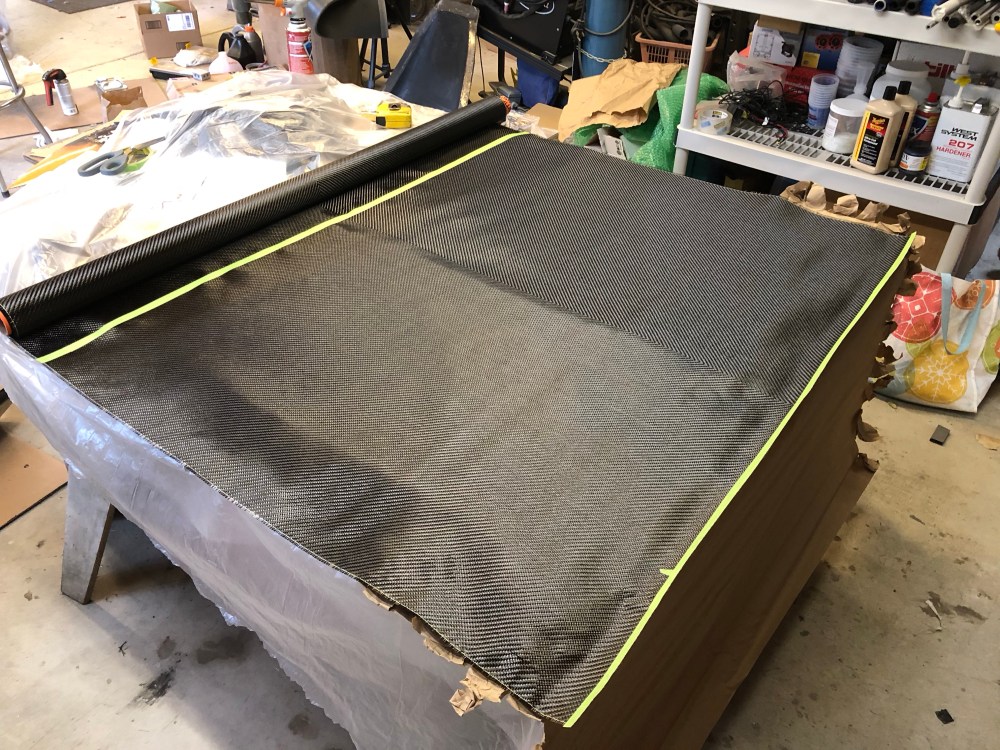
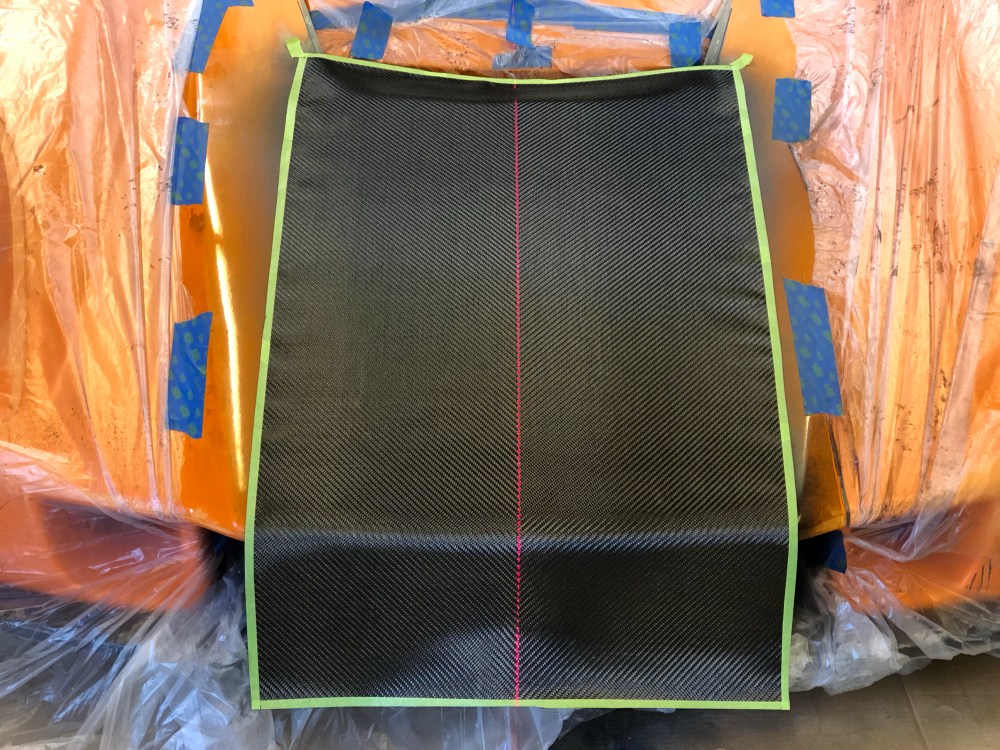
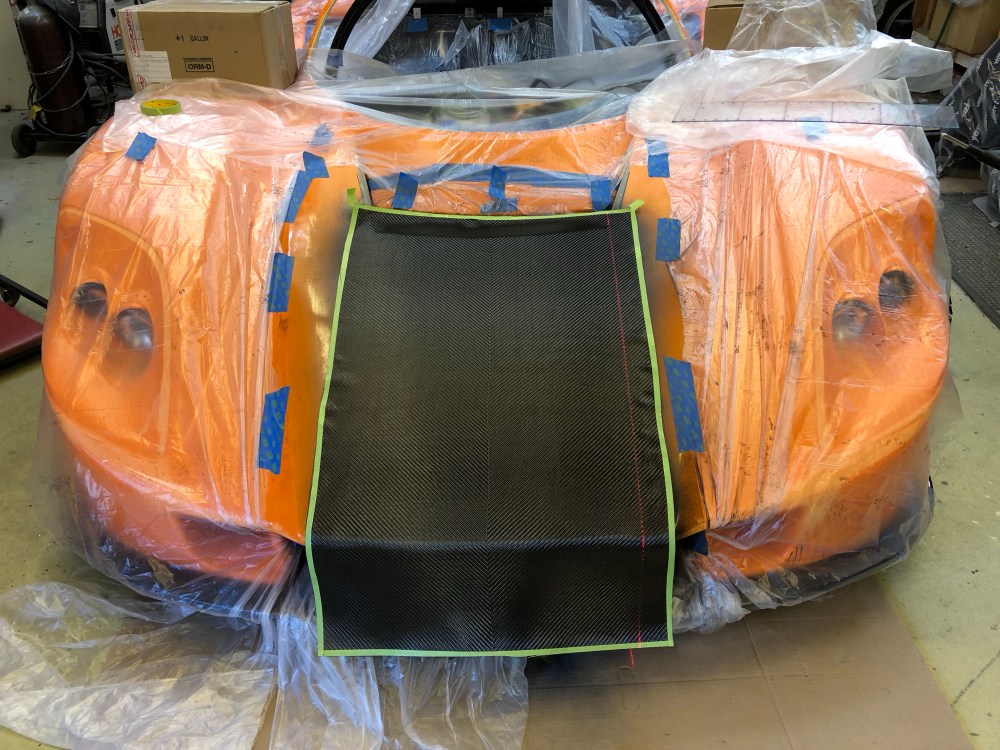
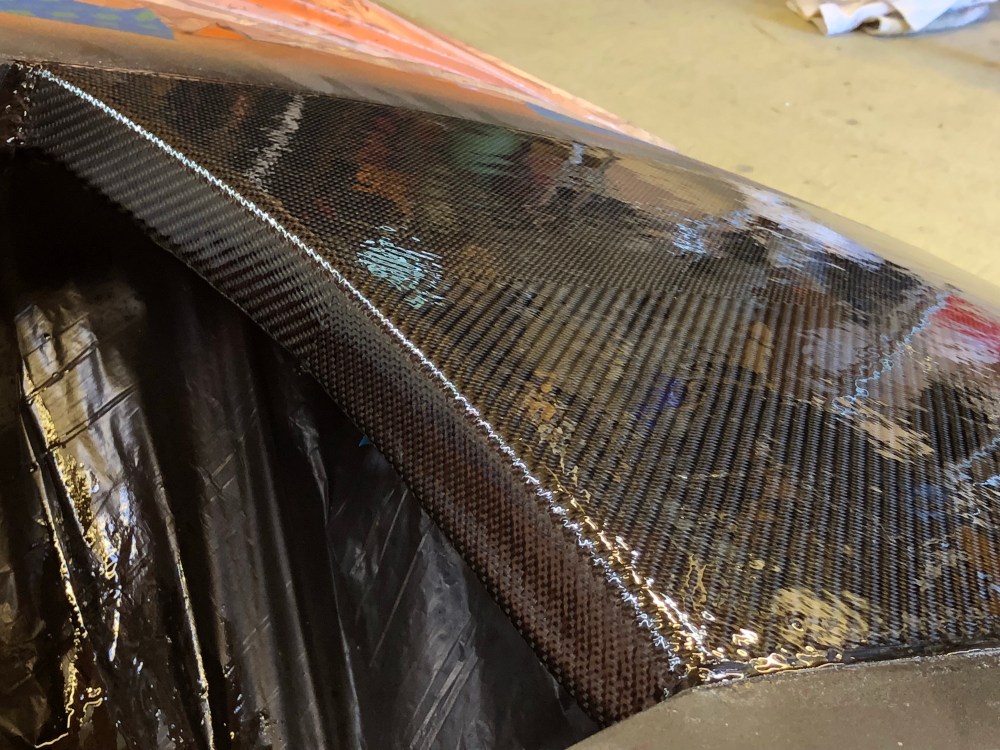
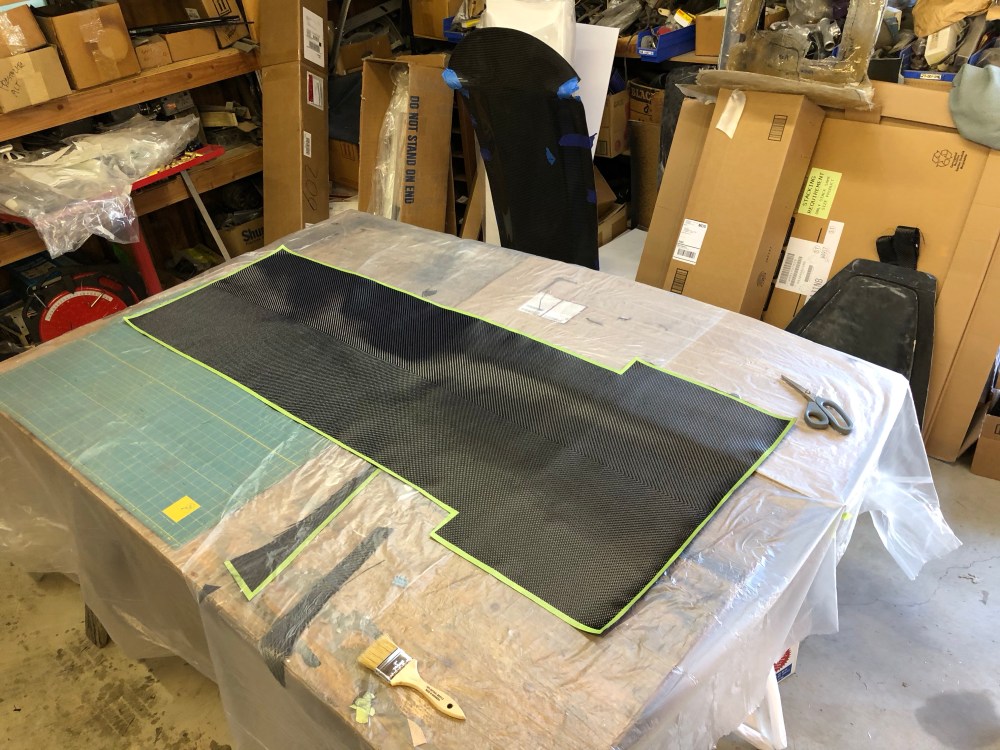
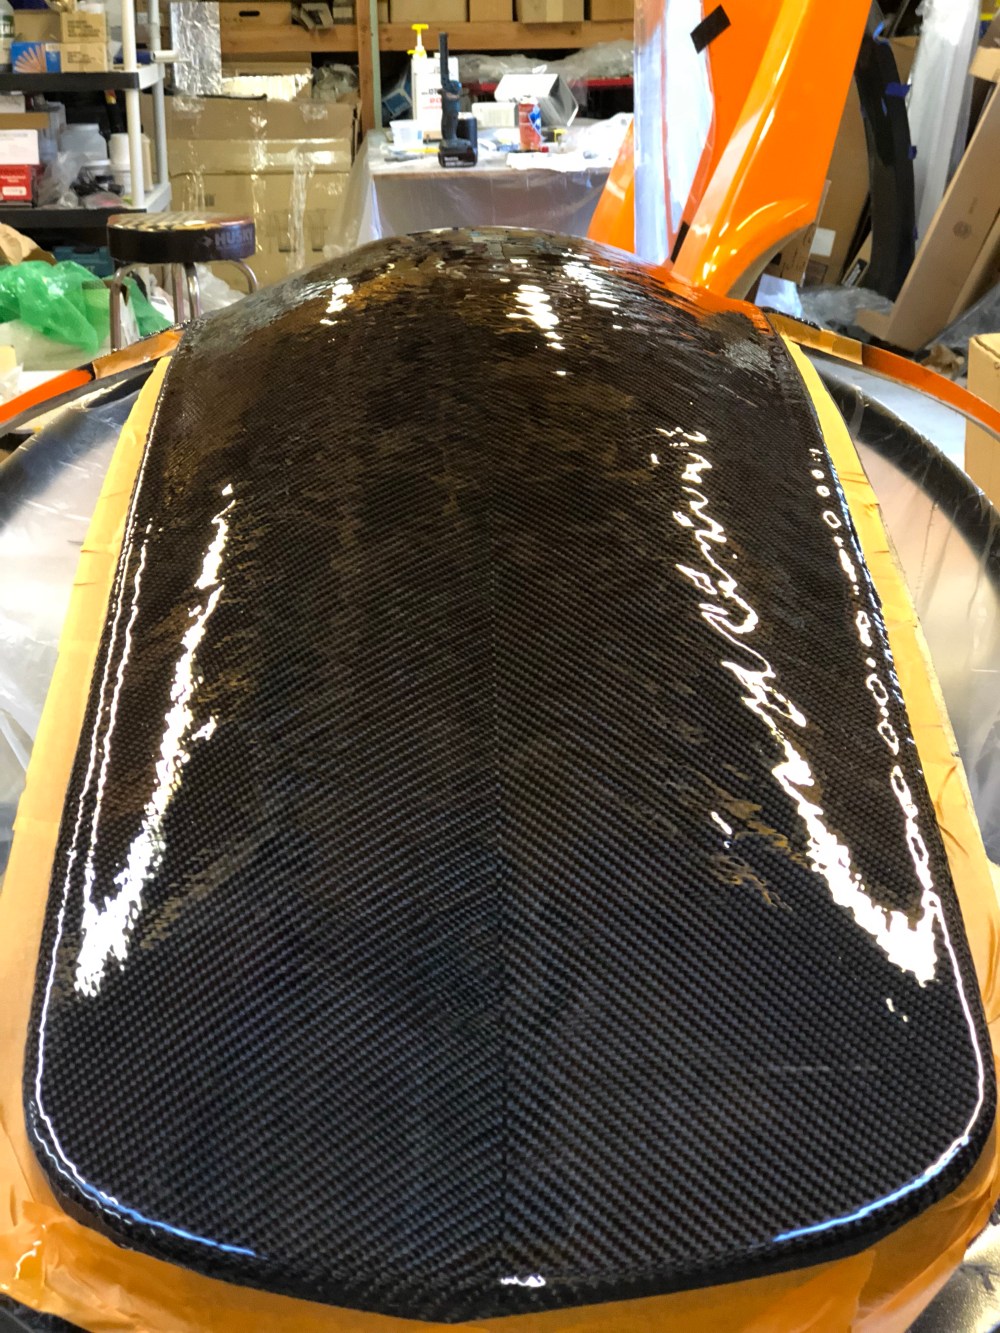
… as my inspiration, I decided to skin a portion of the hood with a sheet of 2×2 v-twill carbon, similar to the Koenigsegg. I had originally considered using two sheets of standard twill carbon and laying them down mirrored and side by side, but I just couldn’t come up with a good way to get them to mate in the middle without looking totally slapped together. A day of random internet browsing and I came across “v-twill carbon fiber” and my brain just about exploded when I saw this:


At this point my soul was feeling pretty crushed. You’ll note there’s a weird wiggle in the weave in the above photo. While laying the fabric down it shifted by ONE set of threads. Unfortunately the spray adhesive is strong enough that if I were to pull up on the fabric it would have ruined the rest of the fabric … so live with it or start over. I’ll admit, I thought long and hard about tearing the whole thing off and starting with another sheet of carbon. There’s no guarantee my second attempt would yield any better results and the thought of tossing all that money for another go at bat wasn’t compelling. So I sucked it up and kept moving forward.
It’s crazy how the human eye can pick out defects when you’ve got patterns in front of you. My hope was that adding resin would obscure the weave just enough that the jog is no longer so jarring.
Note: there’s an alternate technique of laying down resin as the tacking agent, instead of using a spray adhesive as I’ve been doing. The benefit of using resin is it (hopefully) remains wet enough that you can (hopefully) shift the weave as necessary to get it aligned before curing. The West Systems 207 hardener has a fairly short pot life, but once spread out it remains viscous for a long time. However, my experience has been it’ll start gelling relatively quickly – I was concerned if the resin started gelling before I could get everything trimmed and set that the fabric would be ruined. There’s likely other (better/more suitable) resins available for skinning but I haven’t had the time to play around with other resins. If anyone tries this alternate technique or other resins I’d be interested in hearing your experiences. In hindsight, had I used one of those Web-Lock fabrics, I might have been able to cut the sheet to size to start with then laid it down on freshly poured resin which would in turn allowed me to shift the fabric around as necessary to ensure a perfectly straight pattern. Uuungh.
So on we go …

The wet out coats went on fairly easily. Based on my prior experience with the console I knew I would have to go with multiple coats and I’d have to be fairly heavy to get a good initial wet out layer.
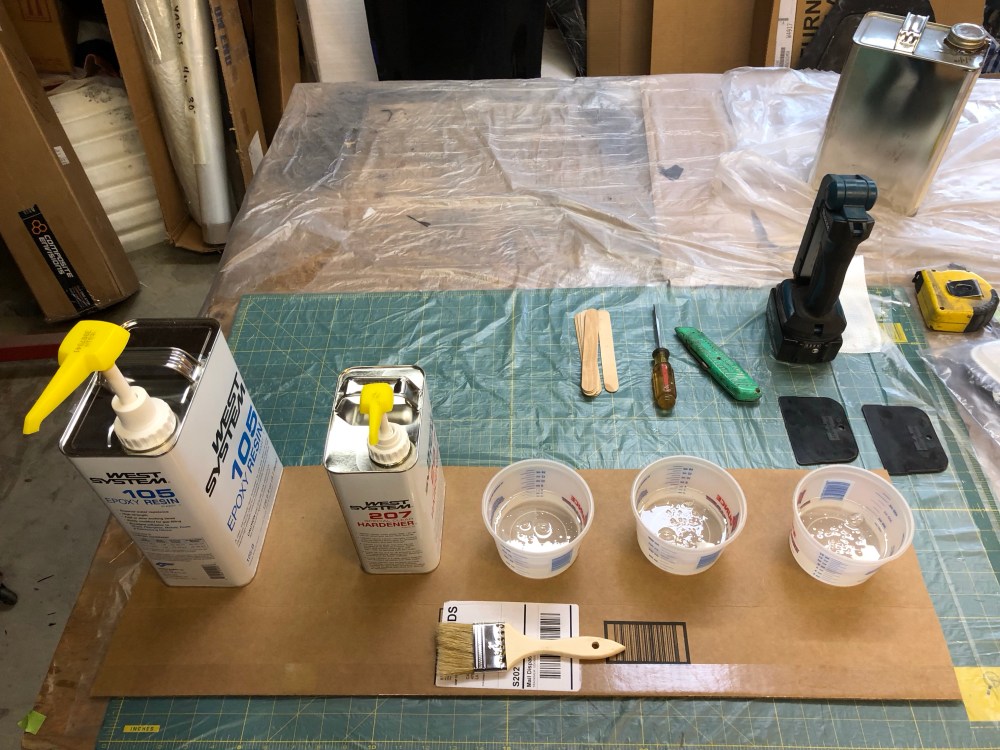
Pro tip: Don’t be parsimonious with the resin, mix more than you think you need for the wet out coat. The initial coat is THIRSTY because you’re getting resin into all areas below the carbon, within the carbon, and onto the carbon itself. Mix a little more so you’re not panicking with half wet/half dry carbon and you’re worried about how two different mixes are going to react. (Ask me how I know). If you’re using the West Systems 105/207 epoxy system, having the pre-measured pump dispensers is invaluable – it ensures you get the identical (and correct) ratio of resin to hardener every time.
Several things I had to keep in mind for this particular skinning project:
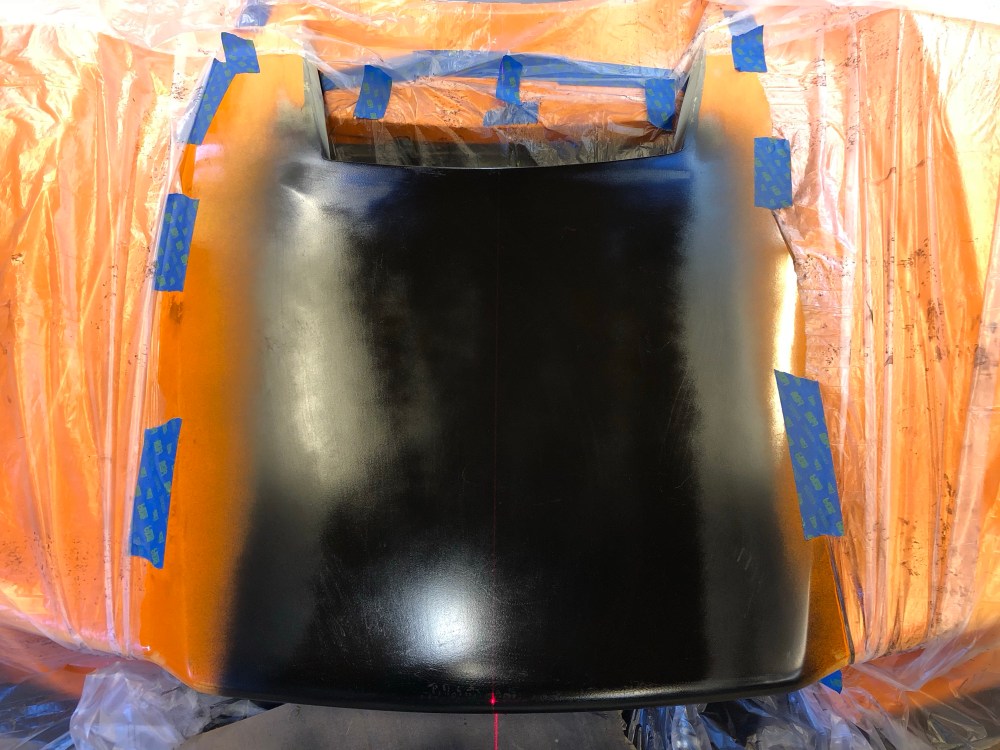
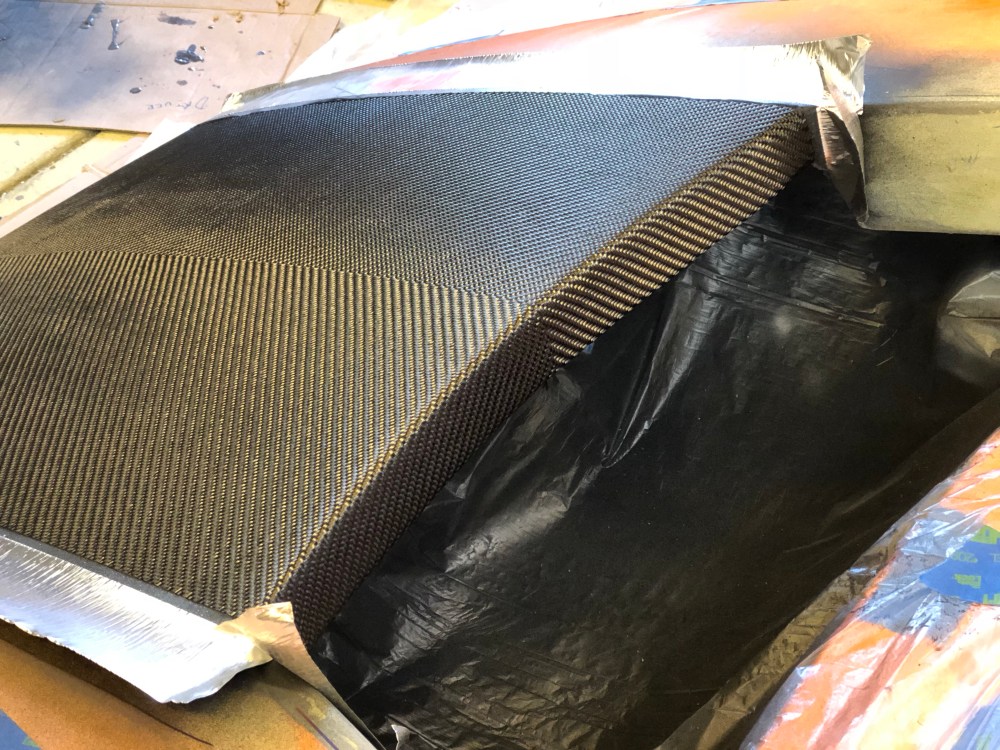
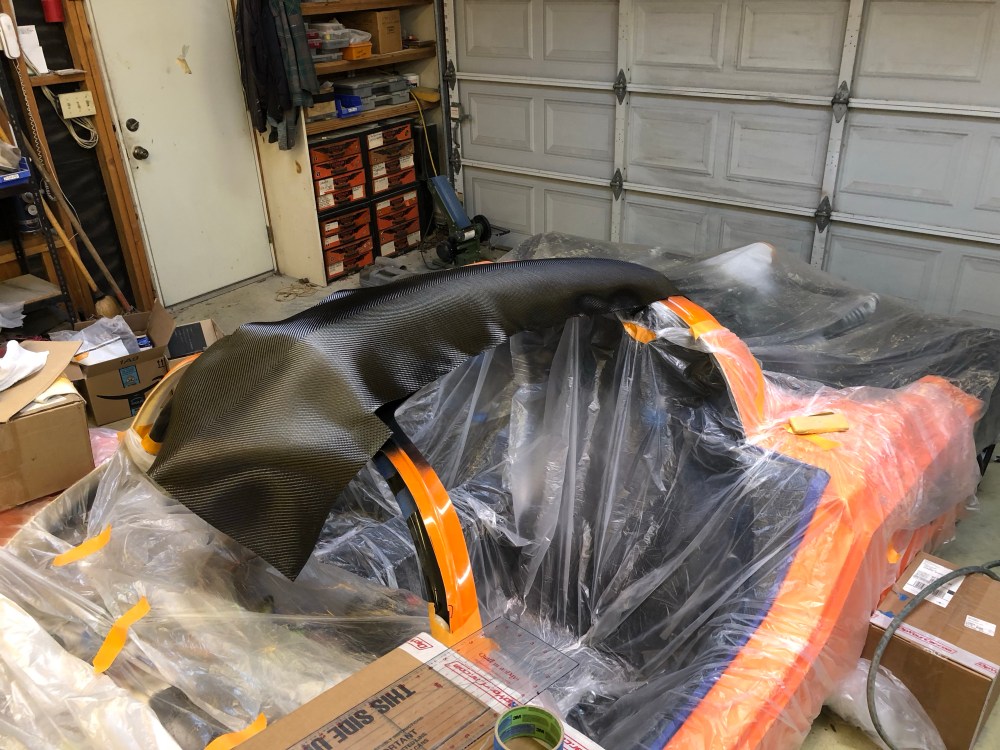
- Since the body was still rough and not final fitted I wanted to get the bodywork somewhat situated as it would be when the aerocatches are installed. I used a few gallons of paint to preload the rear fender area to simulate being anchored by the aerocatches. I also set the splitter level to support the nose. All this to get the body in approximately the orientation it’ll be in when the car is complete. The carbon fiber is just a skin that’s bonded to the gelcoat; I don’t know how much strength it’ll actually have, but I didn’t want to distort the hood by applying the skin with the hood out of place, then possibly having to fight it during final fitting.
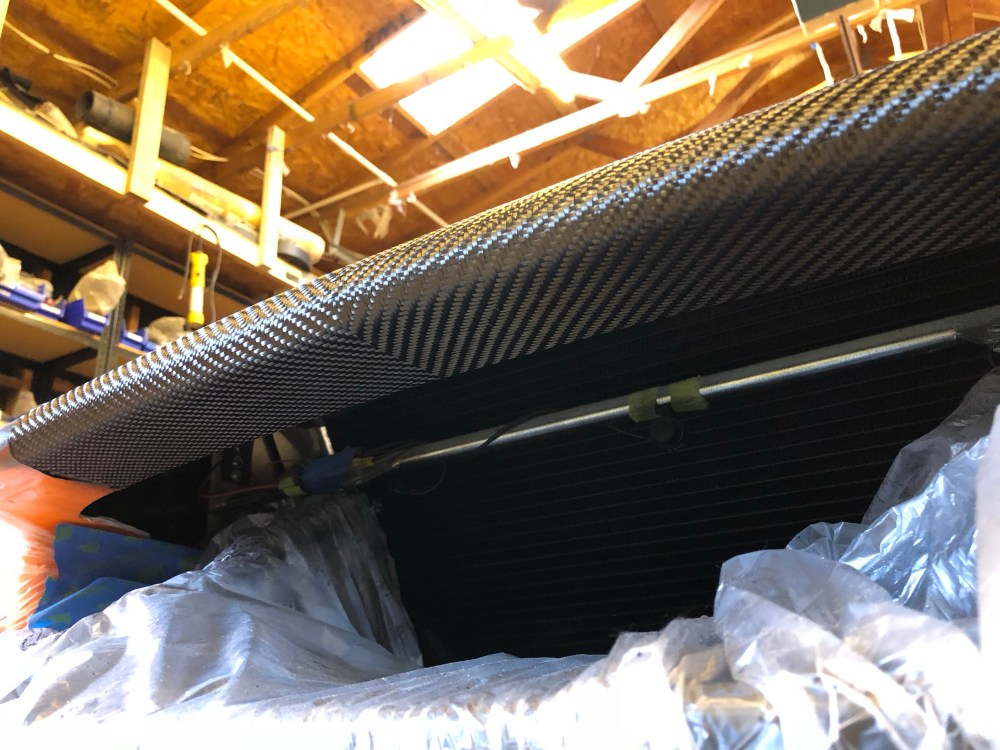
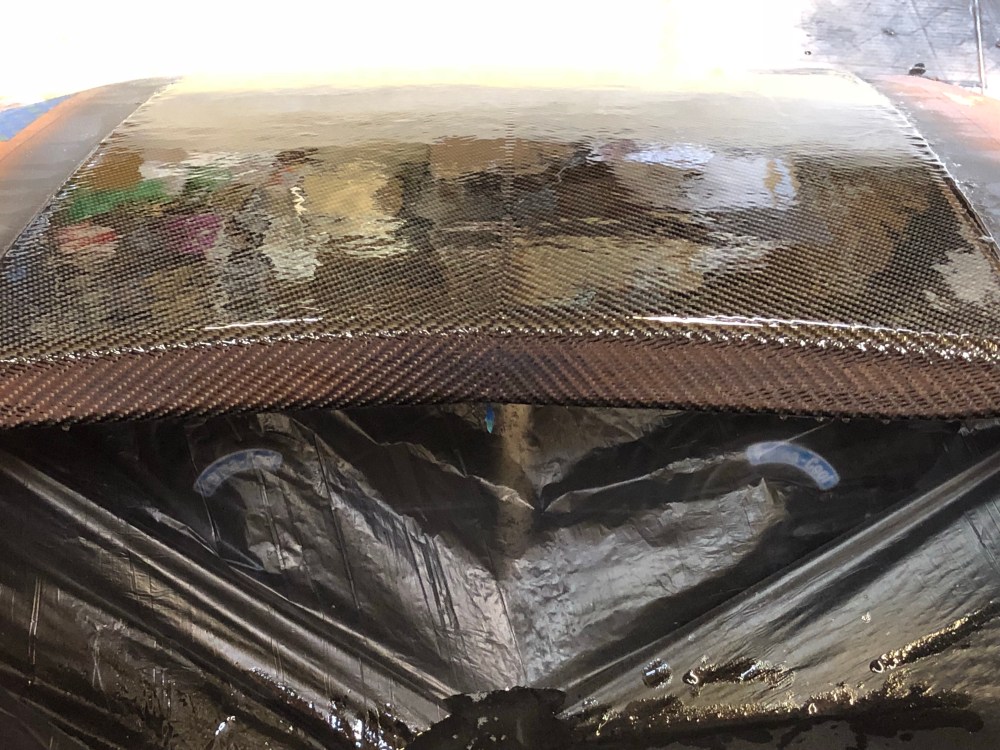
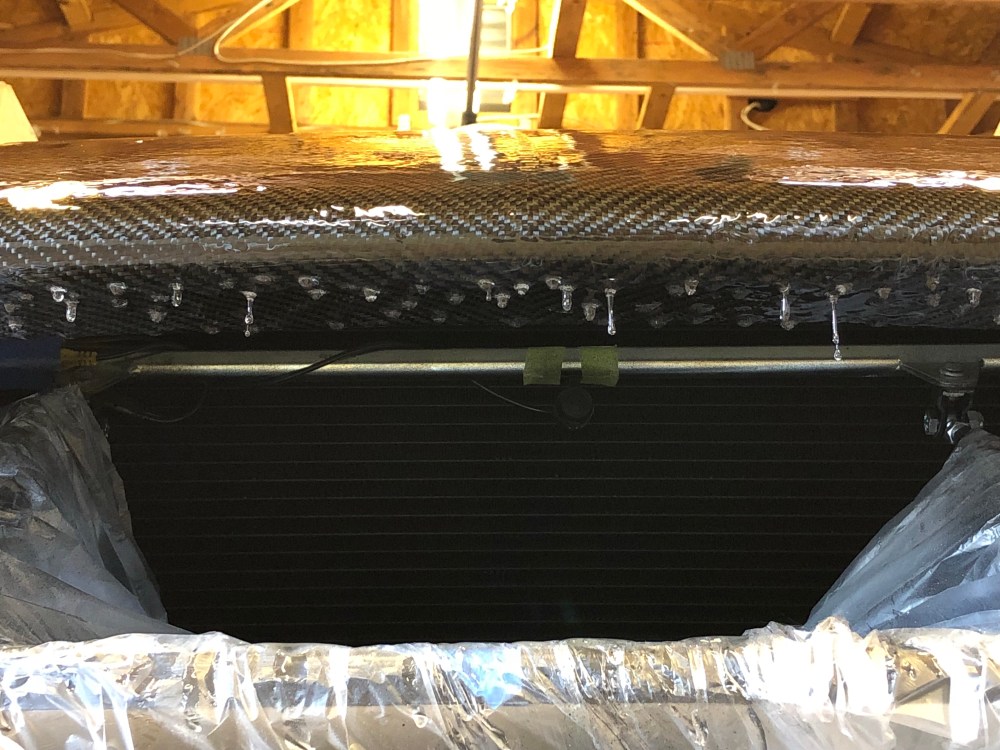
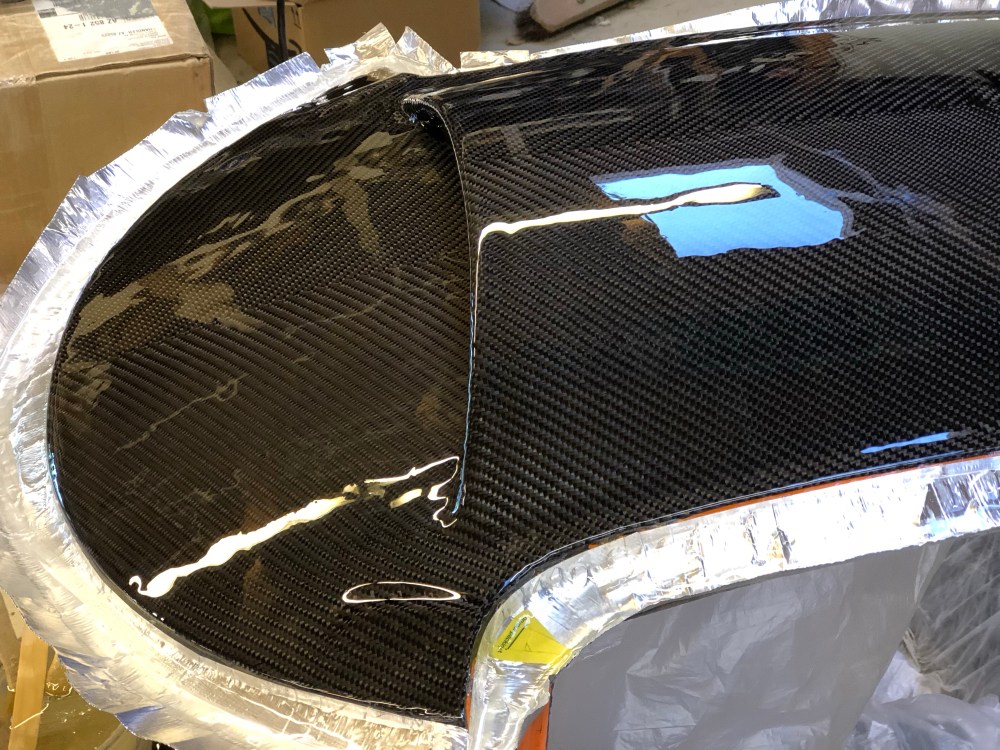
- There are 3 main surfaces or panels that will be epoxied; the vertical rear, the main sloped hood, and the horizontal underside. Each panel will coat differently. The vertical panel will not want to retain much resin, much of it will flow off the panel before it’s able to cure. The sloped hood will push the resin down and the epoxy may not coat evenly from top to bottom – I figured it may pool a bit near the nose of the car. The horizontal lower piece is flat so I’m not sure how it’s going to hold the resin, I’ve never tried to coat a panel upside down before!
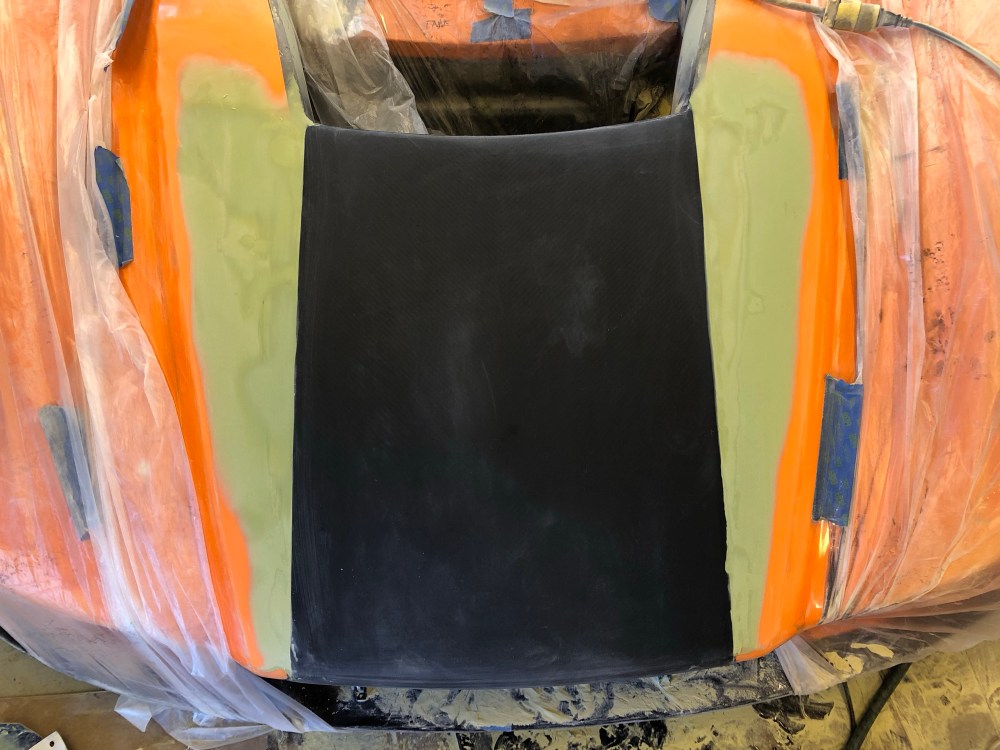
- I wasn’t set on the final aesthetic; either a rectangular piece sort of like a racing stripe, or one where the carbon is shaped like a V, similar to the Koenigsegg. I decided to go forward assuming I was going to do the racing stripe idea; if I decided I wanted to go with the V design I’d just mask and paint the carbon.
- The left and right edges of the carbon piece aren’t critical. Since the skinning process creates a layer that’s not insignificant, I’ll have to blend the body into the carbon using body filler. This is why I say it’s not critical to get the very edges clean – and it’s basically impossible to do with a raw cut edge of carbon cloth. You can get a clean edge with pre-preg (or maybe the Web-Lock stuff) but strands are going to come loose if you’re using plain woven cloth.
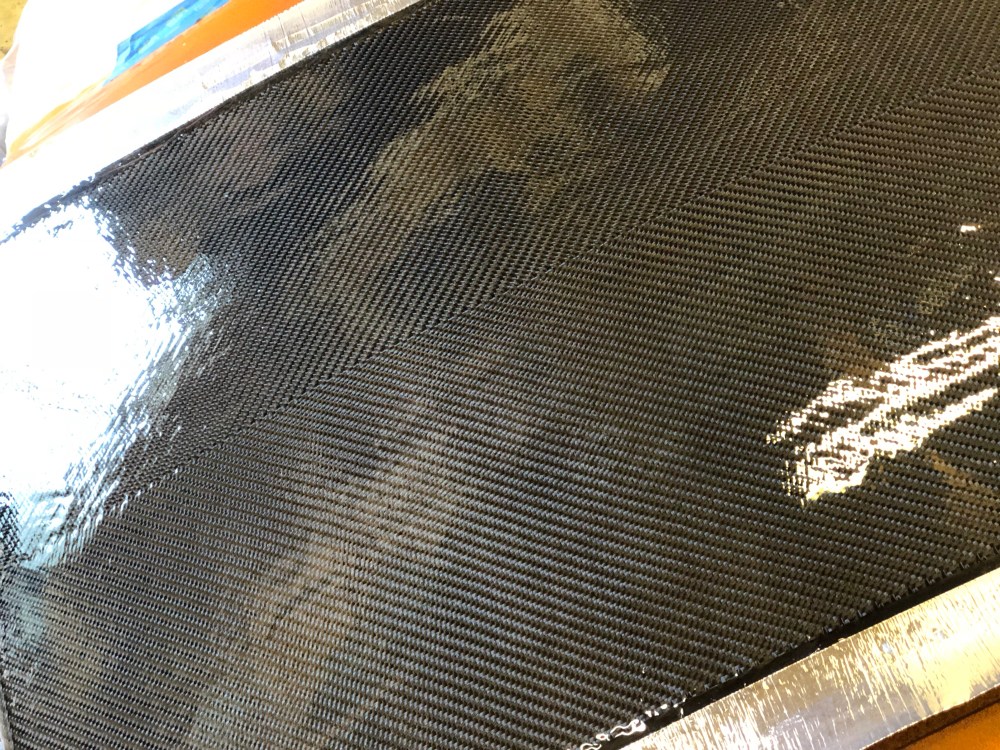
As happened with the center console, the buzzing insects seemed to be attracted to the hood. 3 of them in fact. I found 3 dead insect carcasses encased in the resin by the time I was finished with the final wet out coat. Luckily the resin hadn’t gelled too much and I was able to extract each by lifting them with the corners of razor blades – a pretty nerve racking experience. I’d have been fine leaving them if these were my final layers of epoxy (since I’d have so much thickness to sand back), but since these were the initial wet out coats I couldn’t risk sanding down into the carbon threads to extract bug carcass.
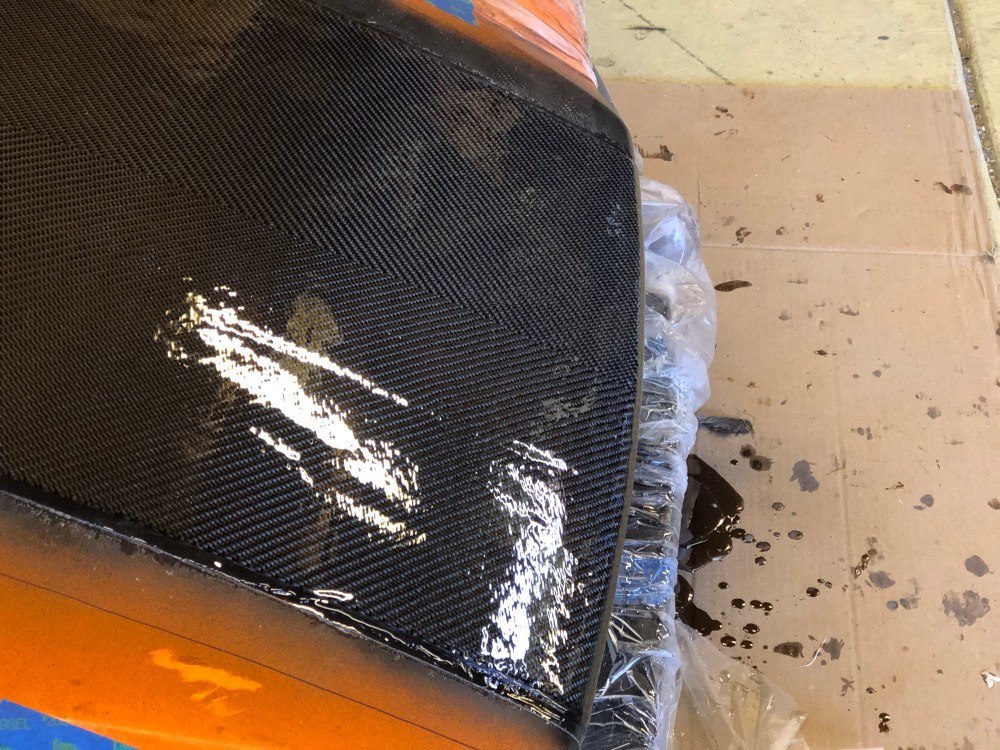
So after the wet out coat cured here’s what I’ve found; the vertical surface near the radiator exit is pretty thin as I expected. The top surface of the hood is fairly thick but also a bit lumpy left to right and up and down. Seems my paddle work really has an effect on just how wavy this surface is. There isn’t so much of a slope that the resin is really running down or pooling near the nose of the car. The underside of the car … is a mess. Applying resin on an upside down surface is a pretty terrible idea. It pools at the low spot – since the hood is actually pretty level left to right, the low spot is pretty broad. So there’s a pretty large section where the resin is exceptionally thick. In other areas, it’s just lumpy as can be. There are streamers of stalactite-like boogers of resin hanging all over. This area’s going to need a LOT of work to get flat. Thankfully it’s on the underside, will basically never be seen, and therefore isn’t that important. I’ll fine tune this surface once I get the nose off on its own and access is better. For now, I’ll concentrate on getting as good a coat as I can on the two visible surfaces.
I started off with 220 grit sandpaper and went to town on the hood. I had to really knock it back pretty far to get it mostly level. After clogging up a few sheets of 220 I stepped it down to 180, then 140. At 140 I was making quick enough progress that I had to be careful not to go too far. On the vertical surface at the back, I hit it very carefully with 220 then followed up with scotchbrite – it’s pretty thin back here, even with 3 wet out coats.
I came back at the hood with another 3 coats to build it up some more – there were a few areas of the wet out coat that looked a bit thin after all the sanding I’d done. I started sanding the final coats in preparation for clear coat after letting it sit for a week. With the epoxy fully cured it sands better and doesn’t clog up the paper as much.

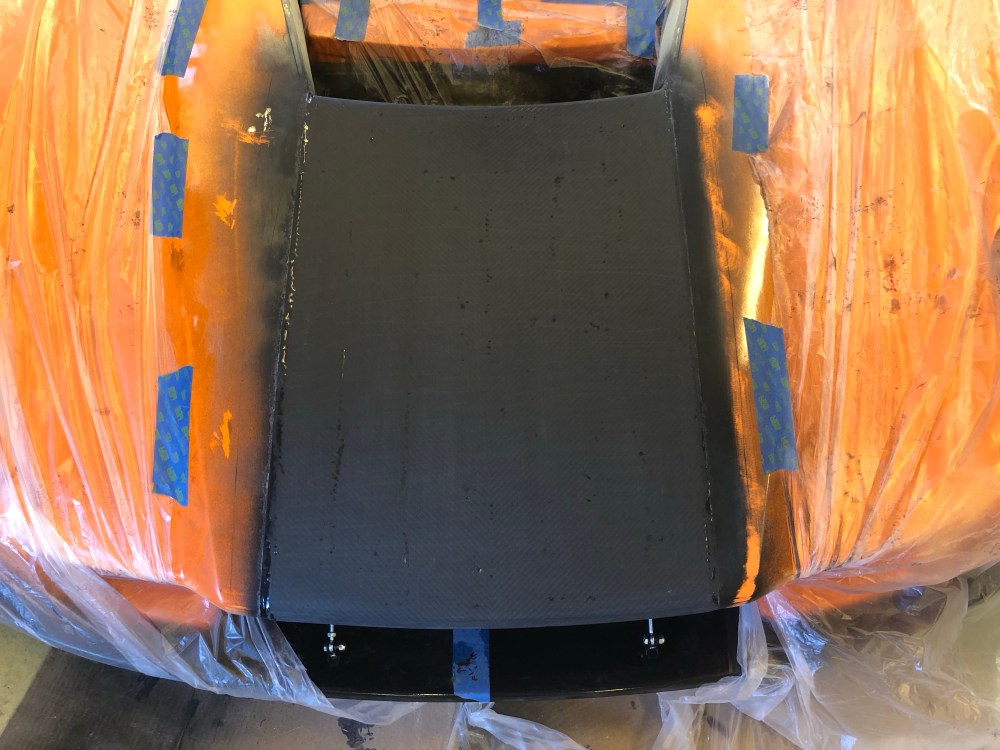
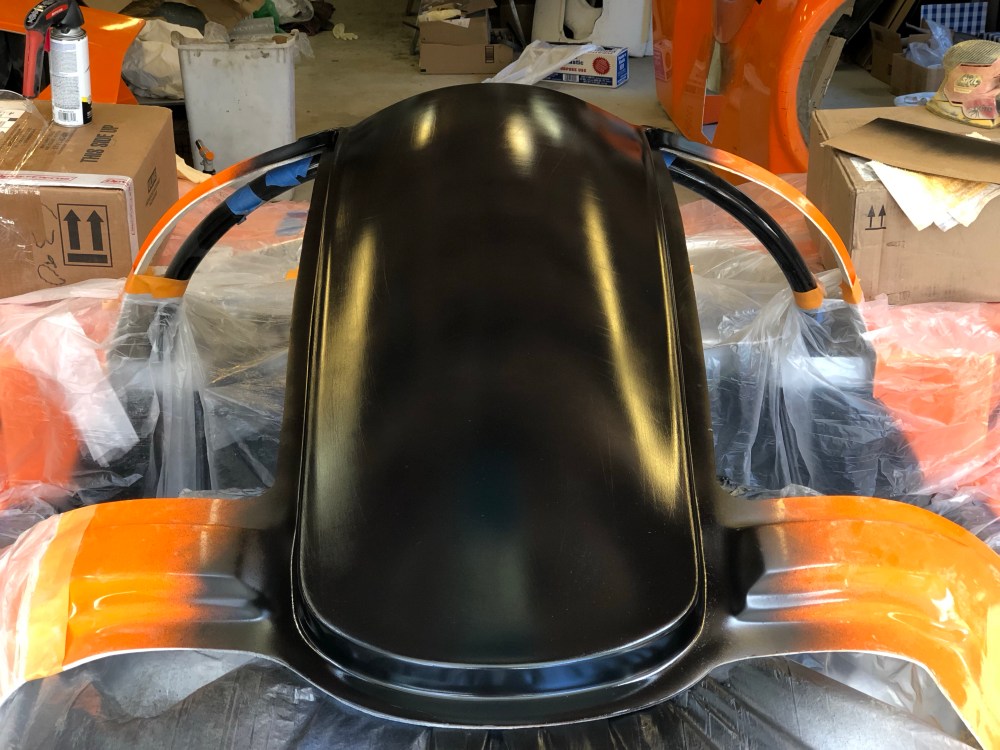
I was feeling pretty buoyed with the results of the hood so it was time to move onto the roof. The carbon scheme I’m shooting for is similar to the Koenigsegg shown at the start of this update; hood and roof/green house. The procedure is the same as the hood, only now the stakes are ratcheted WAY up since the carbon usage is nearly double what I used for the hood. Another trip to the closet so I can pull out my Big Boy pants!
Since I haven’t final fit my doors yet there’s some concern there will be a mismatch between the doors and roof panel. I’m betting on using the epoxy surface as the surfaces I’ll need to match up – so getting this done now before final fitting of the doors is necessary. As with the hood, I’ll need to build up a transition between the original gelcoat skin and the carbon.


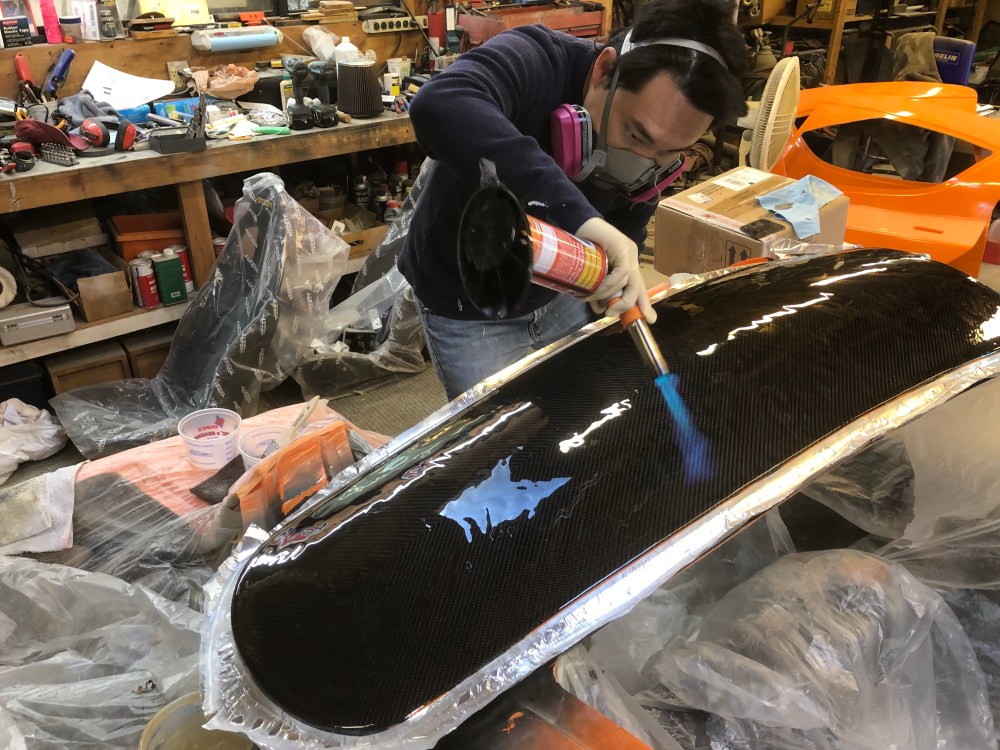
To avoid having a small container of burning resin I decided I would mix up the massive amount of epoxy in multiple containers, all at the same time. A large quantity of epoxy in one container sets off VERY quickly. As the resin cures it releases heat; if the heat doesn’t have enough exposed surface area it builds up and heats everything in the container, accelerating the curing and producing even more heat. It’s a vicious circle and if there’s enough resin in a small enough pot you get combustion. All bad.
I can’t mix a batch, use it, mix another, then use it because by the time I get the second batch ready for use the first will have already started gelling. You do NOT want to apply resin to an edge that’s still in the freshly gelled state. If you disturb that gel it’ll cause hazing, bubbles, or clumps to form. This is why when applying subsequent coats I generally wait ~3 hours before going for a re-coat. By then the epoxy has cured enough it’s not going to be disturbed by re-coating, but it’s not so cured that the next layer can’t chemically bond with what’s already there. Wait too long before the next coat and you’ll have to sand otherwise you’ll have adhesion issues.
By having multiple smaller batches ready to go, I can quickly apply each batch and get the resin spread out over a large surface area. Doing so keeps the heat down and significantly slows the curing process – hopefully slow enough for me to get all the resin down and still have time to brush/paddle it around as necessary to get thorough wet out. This is less of an issue for subsequent coats because those can be poured right onto the roof as soon as the pot is ready to go, no need to brush it on. The brush is only really needed for the initial wet out coat because it helps to push the resin down between the fibers – at least I think so.
I was pretty nervous getting the initial resin on but it went relatively smoothly. At least I thought so …
Houston – we have a problem!
It seems one of two likely scenarios occurred next. As the carbon fiber soaked up the resin, it began to swell. The other is I waited too long between tacking the carbon down, and laying on the first coat of resin (I waited 2 days whereas I normally apply resin within 24 hrs). What happened next I couldn’t have dreamt in my worst nightmare.
Wrinkles.
Wrinkles everywhere.
The cloth started pulling up all over the place. I couldn’t pull the cloth down because the edges were all taped and removing the tape now would have pulled the sheet up off the roof, destroying the weave. So I pressed on.
Literally – I pressed down on all the wrinkles with a plastic scraper.
I made sure all the wrinkles were well saturated with resin then I tried pressing down, hoping they would stick. It kind’ve helped here and there but it was mostly an EPIC FAIL.


Wet out coats down and cured, time to sand down the roof and keep my fingers crossed. Uh-oh, not so bueno. I wasn’t able to get it fully leveled before I started hitting carbon cloth. Some of those wrinkles were pretty sizable. I backed off on sanding much more and hit everything else with a scotchbrite pad. The issue with wrinkles – beyond LOOKING bad – is it means the overall resin layer has to be even thicker than normal because you have to build it up at least to the “peak” of the wrinkle, then add a bit more to give the wrinkle an appropriate covering of resin.
Fingers crossed – time for the final coats (hopefully).


Now the hard part – waiting a week to let the resin cure before final sanding it. If I’m not able to sand the roof level before hitting carbon cloth again I’ll have to lay down some more resin. Fingers crossed!
Oh – this V-Twill carbon fiber pattern? Yeah, I wouldn’t recommend it. It’s CRAZY difficult to lay down so the V pattern is centered and straight for any length. Go with the standard 2×2 twill pattern if you’re going to attempt carbon skinning. There’s no need to center the cloth and any shifts side to side don’t stand out. Using the standard twill pattern also means you can lay down resin first, before applying your cloth so you can continue shifting and moving it around to get all the wrinkles out.
