In an earlier post I said sometimes buying a new tool is as exciting as working on this car – and so it is with the new BendPak HD-9 lift. Our garage is a narrow 2-car garage. I wasn’t about to park either my SLC or daily driver outside – and no way was my wife letting me park hers outside – so we needed to do something about getting a third parking spot inside the garage.
With the way our house was built and permitted there isn’t a possibility to increase the size of the garage, so I started looking into getting a lift. I looked at all the popular lift manufacturers and considered their various offerings. After way too much reading and YouTube videos I’d narrowed my selection down to either a 1-post lift made by AC Lifts (based here in San Diego!) or a 4-post made by BendPak. Both companies have solid reputations and I’ve already been really impressed by the QuickJack which is made by Ranger – who also owns BendPak. I had considered a 2-post but the SLC just isn’t a car that does well on a 2-post (IMHO). Raising the car on a 2-post means the suspension will remain in full droop for the entire time it’s in the air – I generally don’t like to have the suspension on any car sagged to the point of bottoming the shocks or allowing components to crash/bind. The front suspension will droop until the front shock reaches maximum extension. The rear suspension will droop until the rear pushrod crashes into the upper control arm or the bellcrank crashes against the rear shock. Not good either way. Since this lift is primarily going to be used for storage/parking, having a post right where I’m trying to exit my 2-door sedan would also make getting in and out cumbersome. So it was either a 1- or 4-post lift.
Given how narrow our garage is I really wanted to go with the 1-post AC lift; advantages include the narrowest width requirement and fewer obstructions in the middle of the garage (no posts, I would position the post side toward the wall). What ultimately killed it for me is the cost (more than twice the cost of the 4-post by BendPak), and the very strict concrete requirements due to the high loading imparted by the 1-post design. The 1-post lift uses a highly cantilevered design; due to this, it requires placing many anchor bolts across the base to secure the lift to the ground, otherwise it would lean over to the unsupported side. To make this system work (in my garage) I’d have to dig out a majority of the garage floor slab and re-pour – adding even more to the already substantial cost of the lift, not to mention the labor (I’m getting really tired of breaking out and pouring concrete!). There are cheaper 1-post lifts available but photos showing cars tilted mid-air scared me off – the AC Lifts design uses super stout material and has strict requirements for concrete strength for a reason; it’s the best 1-post lift available and there’s a premium for that. The benefits of a 1-post lift just didn’t justify the added work and expense for me.
The 4-post lift design is much more tolerant to a thinner/older slab such as in my garage which meant no additional concrete work/expense. Pricing for the highly rated HD-9 lift is much more reasonable – enough to make avoiding the posts a non-issue if I suddenly felt compelled to take a walk around the garage. There’s also a nifty caster option which would allow me to move the lift should the need arise. The “portable”/non-permanent nature of this feature really appeals to me.
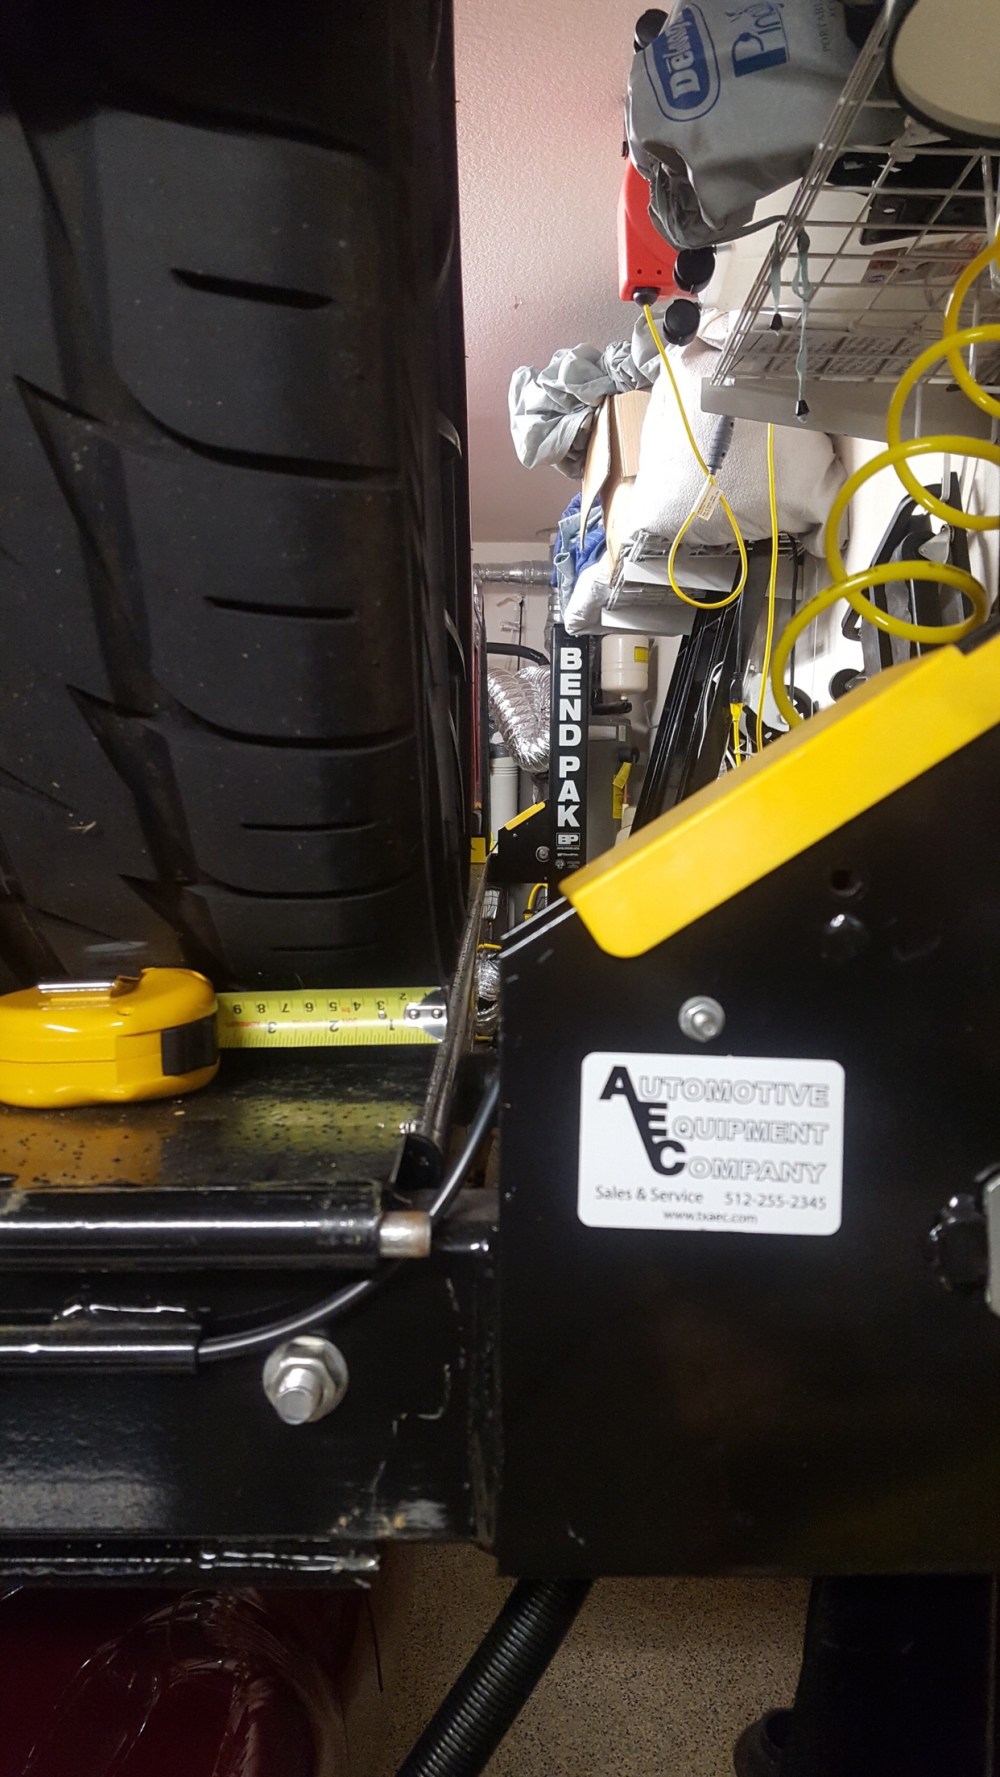
Once I downselected to a BendPak 4-post I really wanted to go with the HD-9ST, a narrower variant of the HD-9. The HD-9ST has a total width of 99-3/4″ whereas the standard width HD-9 is 110-1/4”. I really wanted those extra inches so I could push the lift as far to one side as possible, making it more accessible/easier to park a car in the non-lift side of the garage. After much back and forth I was convinced to go with the HD-9 due to the SLC having a very wide track. Former SLC owner JBurer happens to have an HD-9ST and he spent considerable time telling me how difficult and nerve wracking it was to park his SLC on the lift. The BendPak lifts feature a steel plate which protects the locking mechanism from being run over by an errant wheel. The issue is the outer edges of the SLC wheels come to within ~1.5″ of contacting these plates if the car is perfectly centered as it’s being driven onto the runways. It’s a great way to destroy a wheel or tire if you make contact here while driving up. I don’t plan to have my wife guide me onto the lift every time I want to park the SLC so the wider spacing of the HD-9 makes it a one-person task to get on and off with plenty of room to avoid contacting this portion of the cross-tubes.
OK – decision made. Placing the order was relatively quick and simple – full disclosure, I inquired with BendPak about a possible discount and mentioned I would be doing a write-up of the lift. They responded positively, extending me a small discount – SWEET! I was already planning to write about the lift anyway so getting it at a reduced price was a super appreciated gesture! In addition to the lift I ordered some drip trays and the caster kit. Options selected, payment made, lift in stock and ready to ship! They were really flexible about my delivery date since I needed to plan pick-up with my father in law – the lift weighs ~1800 lbs and I’d need his truck and trailer to transport the lift from the delivery depot to our house. With the way the holidays worked out, BendPak arranged to have the lift arrive at the local shipper depot the Friday before Christmas. Pick-up and transportation was trouble free; a friendly forklift driver at the XPO depot loaded our trailer and it was a short drive back home.


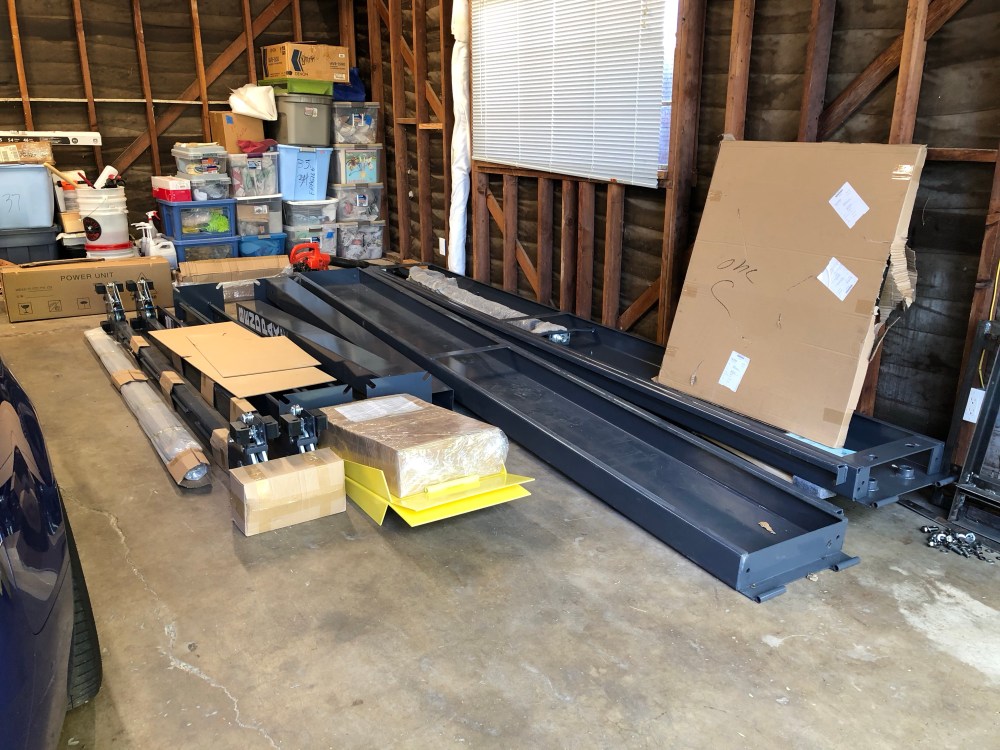
There was no way Bob and I were going to move 1800 lbs of steel ourselves; we unpacked the lift while it was still on the trailer and moved each part into the garage one by one. The lift comes fairly efficiently packed; two steel frames keep all the important stuff up off the ground and tied together, cardboard surrounds everything. Steel bands and packing cellophane complete the wrapping. Some basic hand tools and diagonal cutters got everything unpacked. The runways were the heaviest pieces – boy, it took all the two of us had to get those guys off the trailer and into the garage. We were super thankful I had a few dollies to help with the moving. Given the relatively light protective wrapping, I was surprised to see everything made it home in great shape. After all, it’s 1800 lbs of steel interlocked and strapped together, some amount of dings and nicks should be expected. The only real damage to the lift was made by the forklift which loaded our trailer; the forks seem to have dug into the lower (as packed) runway, leaving several good gouges. Not a big deal – no structural concerns and this is the side the car will be driving back and forth on anyway – it’s bound to see wear and tear during service.


What better way to spend Christmas afternoon than to hang out in the garage assembling a car lift? I certainly can’t think of anything better …

A 4-post lift is a serious piece of machinery and there are exceptionally high stakes involved when operating or standing near this machine. It should be installed by someone who knows what they’re doing. However, if you’re reading this or you’re building an SLC you’re probably a DIY’er and think you’ve got what it takes to build one. This blog post isn’t meant to be a walk-thru of how to assemble this lift, only my thoughts on the assembly process and initial impression of the lift once assembled. These comments are mine alone and this is the first 4-post lift I’ve ever used, let alone assembled – so take the following information for what it’s worth (not much).
I discovered, even after (mostly) reading the instructions, I didn’t really know what I was doing but got lucky and ultimately figured out how to properly assemble this lift. I consider myself fairly mechanically inclined but I still made a few mistakes along the way.
Some helpful tips:
- Read the instructions – don’t skim.
- Read the instructions carefully – don’t skim.
- Read the instructions thoroughly – don’t skim.
It goes a lot smoother if you read (not skim) the instructions, did I mention that? The instructions are MOSTLY good, however, there are a few areas of improvement. Here’s a few things the instructions don’t tell you:
- It is of critical importance that the ladder bars are installed correctly (Captain Obvious kind of statement, I know). Take extra time and triple check that each ladder bar is correctly installed before proceeding. We had a scary moment working on one corner of the lift when the primary lock disengaged and the runway came down unexpectedly. After staring at the lift and trying to figure out how it all worked, I determined we had initially installed the ladder bars incorrectly and this is the root cause for the lock disengaging.
- There are 4 cylindrical spacers/bolts included in the hardware kit. The manual doesn’t state where these should go. These should be installed at the base of the ladder, between the ladder and post. I would recommend installing these once the cross tubes are lifted into place, before the runways are installed.
I figured out what happened to cause the runway to fall while scratching my head on where to install these spacers. It turns out when we installed the ladder bars, we did so incorrectly. There are 2 sets of guide bushings for the ladder – an upper and a lower, with the locks positioned in-between. I correctly installed the ladder at the top, inserting it through the slot in the upper guide bushings. What I couldn’t see is there’s a secondary set of slots in the lower guide bushings which the ladder must also pass through – given my vantage point at the time of ladder insertion, I couldn’t see this because the cross-tube was on the ground and the locking mechanism was obscuring the lower guide bushigs. The correct installation orientation is shown in the manual (Fig 3.5, Fig 4.2) however, it would have been very helpful if this was highlighted with big arrows and circles with DANGER notation – something to highlight the importance of getting this part right, and the consequences of getting it wrong. In fairness, there are lots of warnings throughout the manual so I’m not sure if putting a big WARNING/DANGER symbol next to this step would have made a difference. However, calling special attention to getting the ladders correctly slotted through the upper and lower guide bushings would have made me look for this specifically.


A good visual check to tell whether the ladder is correctly installed is to note whether the ladder bar is straight up and down or whether it has a bow between the top plate and cross tube. If it’s got a bow it’s because it’s pinched between the lower guide bushing and the post, which in turn tries to twist the ladder. If it’s properly positioned between both upper and lower guides it will hang straight vertically.
In our case, since the lower guide was not securing the ladder, it meant the ladder “rungs” were twisted and pushed near the outer tips of the primary lock finger. With enough jostling, we were able to accidentally kick the lock out of the ladder hole, thereby allowing the runway to come down. With the ladder bar properly installed this would not have been possible. The guides hold the ladder in place and won’t allow the locks to disengage unless commanded/forced to open per the design intent.
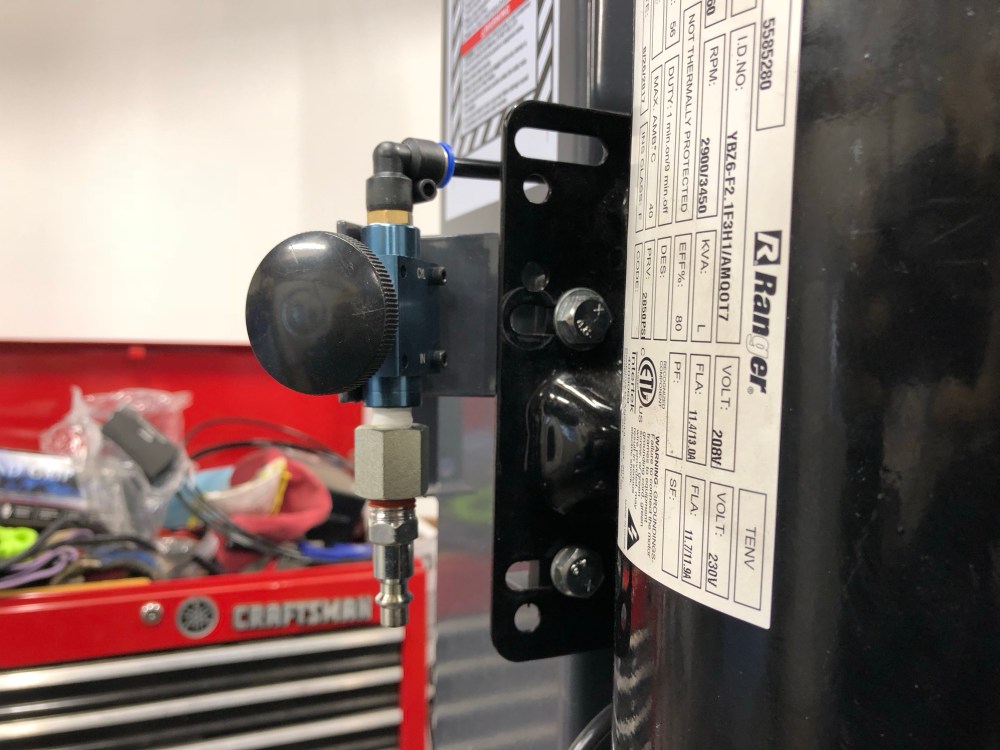
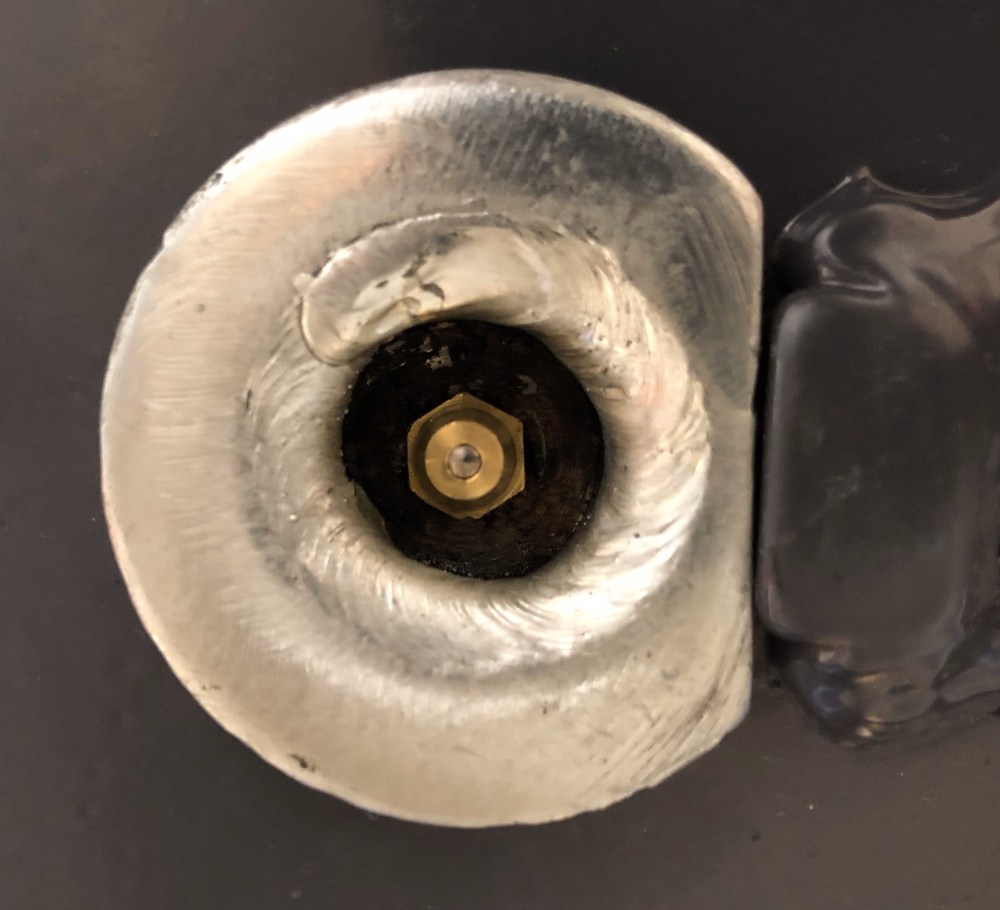
It’s confusing how the manual describes what ports are where on the lift motor. After scrubbing through the internet I came across an HD-9 assembly video in which the builder had the exact same problem. The “power port” – or hydraulic port – is obvious; it’s on the right side (when looking at the motor, lift switch facing you) and covered by a red plastic temporary plug. The “return port” is on the left side (when looking at the motor, lift switch facing you), and is toward the back, or away from the switch. It’s correctly pictured in the manual – but immediately under this picture are the following words: “NOTE: return port may be on the same side as power port on some models”. At the bottom of the page is this: “NOTE: Check the power unit to determine proper connection ports for power and return lines. It will be necessary to remove shipping plugs from both ports prior to installing fittings.” And immediately below the correct picture is another which shows the return port on the same side as the power port. Confusing yet?
The issue is the power unit has no identifying marks or information to denote where the return port is and there’s nothing in the manual which states “If your power unit is X, the return port is here”. So without any additional direction in the manual there’s nowhere else to go but sleuthing on the interwebs or contacting BendPak – tech support not available on Christmas day. Lastly, the power port is a bit obvious given the bright red plastic plug; all other ports on the motor are steel and could be considered permanent plugs, not throw-away shipping plugs.


Once we had the return port figured out it was relatively straightforward to run the hydraulic and pneumatic lines. Note that BendPak uses the plastic pneumatic hose for the return port. Calling it the return port is perhaps a bit of a misnomer – hydraulic fluid doesn’t return to the reservoir via this port. With the locks disengaged and the runways descending to the ground, hydraulic fluid returns via the power port. The return port allows air to move from the reservoir(?) to the back of the hydraulic piston. Something needs to replace the expelling volume of hydraulic fluid as the piston moves otherwise it would move exceptionally slowly, damage the seals, or just not work.
When installing the push button safety valve, I decided to flip it upside down relative to how it’s shown in the instructions. I installed an Industrial style pneumatic quick disconnect and didn’t want it oriented up – the compressor I’m using will be stowed away and the air line will only be hooked up when operating the lift. With the QD oriented down, dust will not fall into, or collect in the air line.
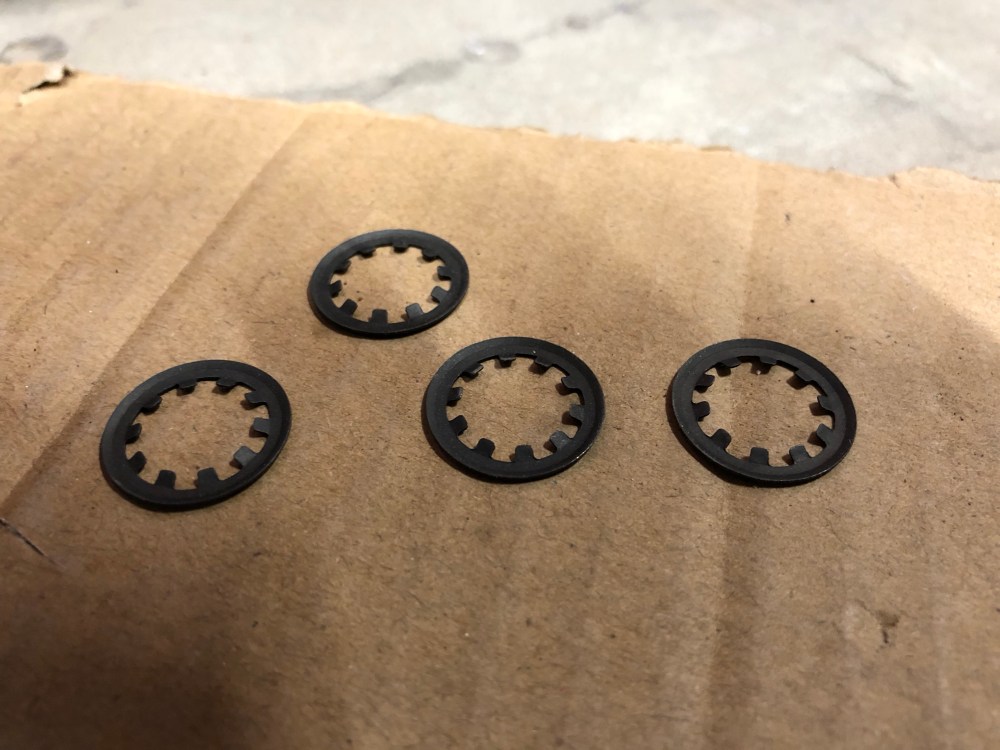
Included in the hardware kit are several finger washers (called rotor clips in the manual); these are used to secure the front tire stop and drive-on ramps. 2 clips should be used to secure each front tire stop – you don’t ever want these coming off. However, using only 1 clip per drive on ramp means you can easily remove the ramp when not needed – preserving overhead clearance for whatever vehicle is parked underneath.


I opted to wire in a 220V plug with a corresponding receptacle in my garage wall. I wanted to keep as much versatility as possible so I didn’t want the motor hard-wired into the garage electrical. With the electrical, hydraulic, and pneumatic systems all run it was time to finally test this out! To bleed the hydraulic piston you’re supposed to raise and lower the lift 6 times; it’s a self-bleeding design so each successive cycle gets more air out. Lifting time is about 45 seconds to get the runways to the top. It takes a bit longer to get the lift all the way to the ground without any load on the runways.
Hydraulics bled – time for the real test!

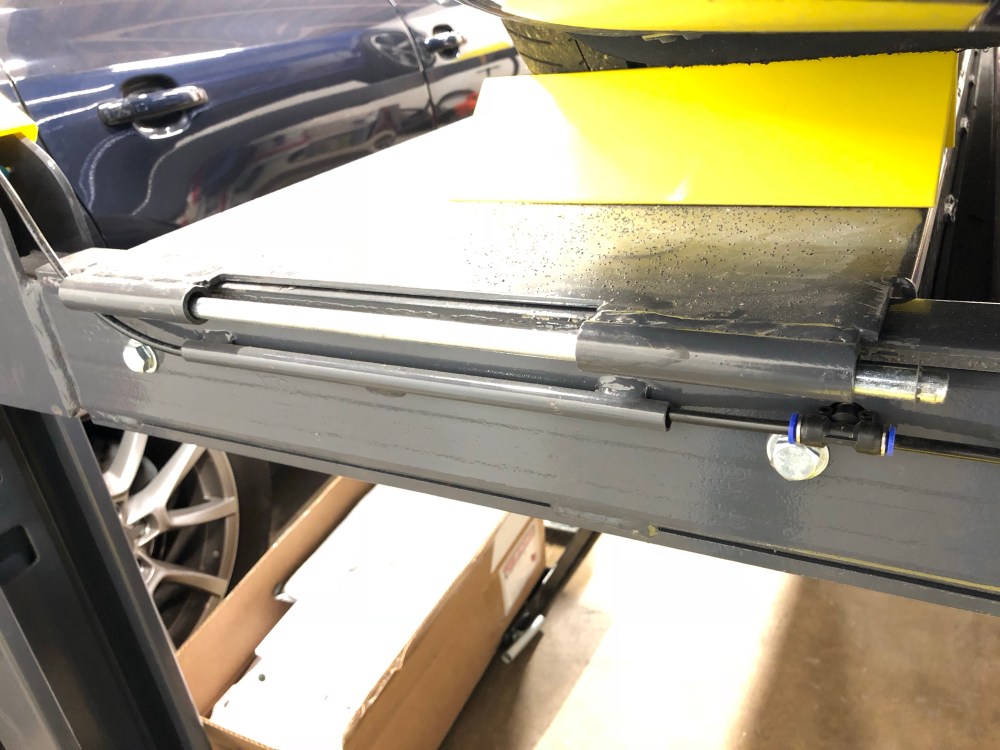
I had Stephanie help me guide my car onto the lift for the maiden voyage. From the driver’s seat, with my head poked out, it’s a pretty comfortable single-person operation but I didn’t want to leave anything to chance since this was the first time driving onto the lift. I set my phone on the ground to record how close my car got to the cross-tube; my daily driver is lowered (almost as low, if not lower, than the SLC). Boy oh boy, did things get close!
I checked the cross-tube for contact and it looks like the S5 just clears the cross-tube, I’d better not gain any more weight! I’m using the standard steel ramps included with the HD-9; I’ve been told the SLC will clear just fine with the front hydraulic lift system engaged. I’ll find out once the car is driveable! I left the S5 in the lowest locked position for a few hours just to be sure it wasn’t going anywhere, and if it did, it wouldn’t have far to go! I knew better than to think it would fall but figured why not? Once I braved up I wanted to see how high I could get the car.
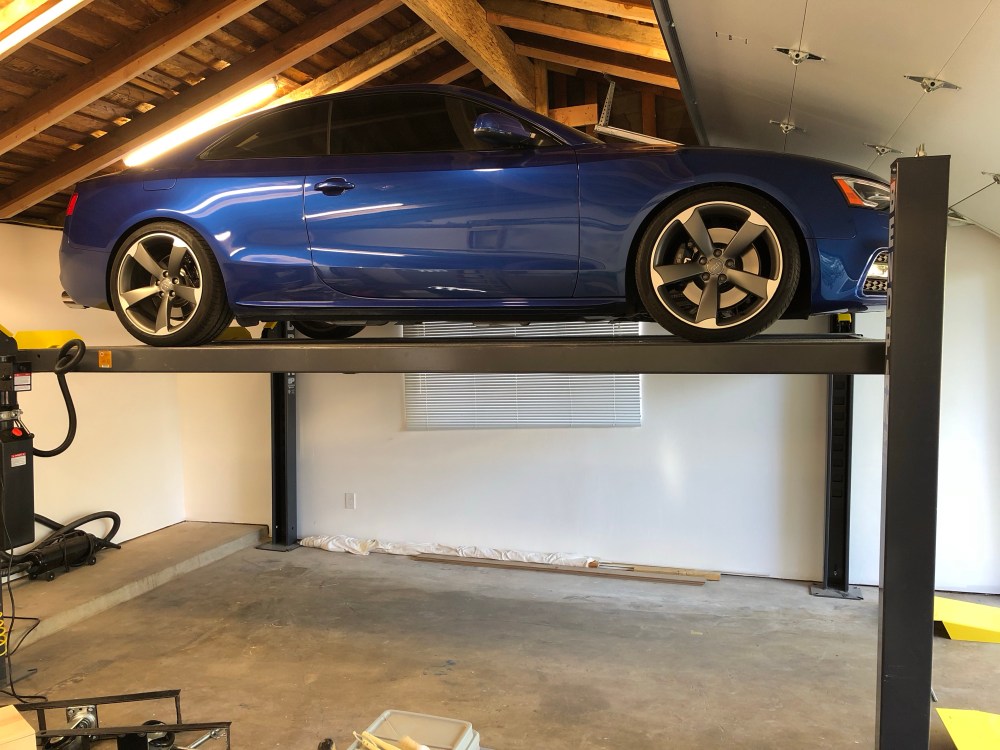
I had a high lift follow-the-pitch garage door installed last month in anticipation of having the BendPak installed. My old garage door was the single-piece pivoting kind which meant it would have smacked squarely into the vertical posts in the open position. A standard garage door lays almost horizontal in the open position; this would have eaten into the available space above the lift and greatly limited how high I could raise a car. The follow-the-pitch door design allows the door to hug the pitch of the roof, giving me that much more room above the lift. As you can see, it’s the only option compatible with a 4-post lift given the size and layout of my garage. A wall mount style garage opener was also purchased to keep room above the cars as unobstructed as possible.
The optional caster kit is pretty cool. For a little under $300 you get 4 heavy duty casters and steel brackets which can be pinned to each leg of the lift. As you lower the runways, the cross tubes contact the caster assemblies and push down on them. As the lift comes down, it forces each post into the air, using the weight of the lift itself as the lifting force. No instructions included for the caster kit but it’s fairly self explanatory.
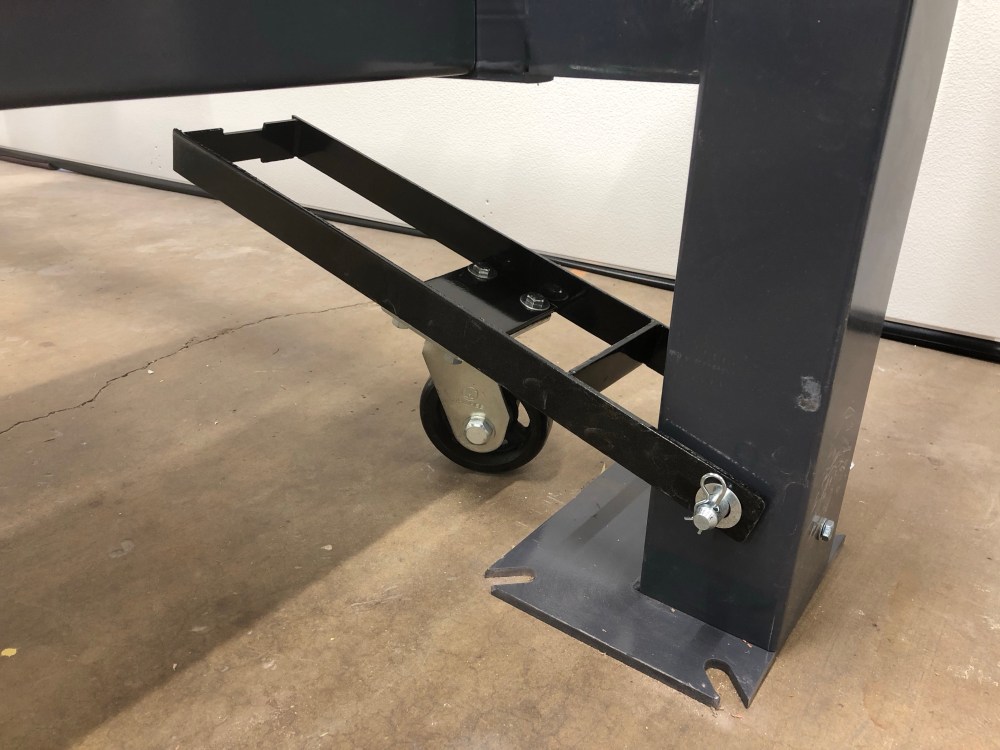
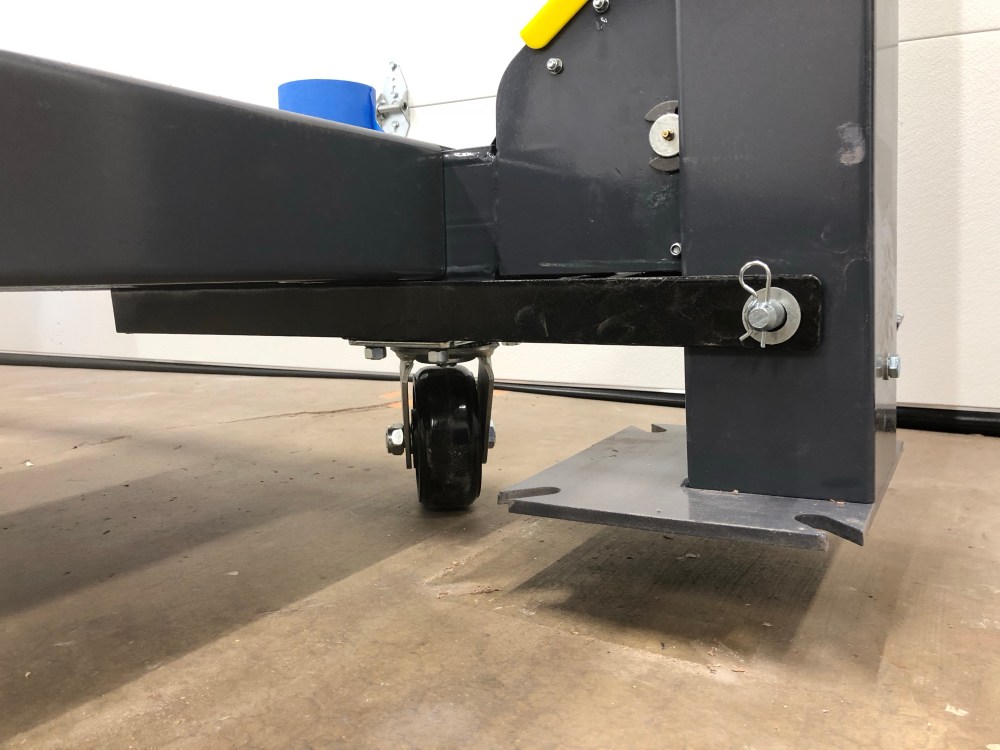
If you need to have a somewhat mobile lift, the convenience factor of the caster option is amazing. I don’t plan to move the lift around much (if ever) but having this capability keeps the lift versatile. I currently have the lift placed all the way toward one wall of my garage. This makes the exterior side basically unusable; there’s not much room between a lifted car and the wall. However, if I need to do some serious work I’d just pull cars out of the garage, install the casters, and move the lift into the center of the garage – making all sides of the lift fully accessible/usable. Since I plan to use the lift primarily as an additional parking space it’s not likely to be moving much – but having the ability to single-handedly shuttle the lift around keeps that option available.
The manual states a minimum of 70-90 psi / 5 CFM is required for proper operation of the safety locks; a trip down to the local Home Depot says you’ll need one of their largest available compressors if trying to meet this specification. I’m thinking I must not be interpreting the manual correctly – the safety locks aren’t constantly leaking/flowing so the rated CFM flow doesn’t seem to be as important as ensuring there’s adequate pressure to actuate the locks. In my research I came across a statement somewhere that suggests the locks require a minimum of 25 psi to actuate – not much pressure at all. Unless there are massive leaks in the pneumatic system, only a small amount of air is required. So I got the smallest, cheapest compressor I could find. It works perfectly.
Overall, I feel the engineering behind this lift is very well thought out and executed. There’s a ton of attention paid to the details –
- The runways have some kind of super grippy sandpaper-like non-slip top coat. There’s NO WAY anything will slide across these runways, dry or wet. If you’re sitting with your legs hanging off one side of a runway in jeans you’re not going to want to swing your legs over without getting up – you may just tear up the seat of your pants. Trust me on this one.
- Ladder bars are independently adjustable, as are the tension cables. This allows you to compensate for an uneven floor (within limits) to get the runways level left/right and fore/aft.
- Zerk fittings for all tension cable pulleys. Cable pulleys are large with beefy axles.
- Very few fasteners. The main guts of the lift system are pre-assembled at the factory and only a small number of fasteners actually need to be installed by the builder. I don’t think it’s a stretch to say someone with basic mechanical ability and hydraulic systems knowledge could assemble this lift without the use of a manual. Assembly is (for the most part) very straightforward.
- Welded guide tubes and cages for hose routing to prevent interference/pinching/rubbing with other components. I was very pleasantly surprised to see how all lines and cables were so neatly routed and either internal or protected from accidental damage.
- Thick, heavy gauge steel. Everything feels very solid.
- Seemingly counter to the above point on feeling solid, once placed on the casters it’s shockingly easy to move. I was able to easily push 1800#s of steel around in my garage and place it exactly where I want.
- No sharp edges/sufficient deburring at all touch points, non-slip runways excluded, duh.
- Adequately packaged, exceptional quality powder coating.
Areas where I would recommend some continuous improvement:
- More/clearer photos/illustrations in the manual as discussed above.
- Pneumatic line instructions are outdated; manual describes how to assemble a 2-piece compression fitting style line, however the lift kit uses push-lock style fittings.
- Permanent identification of power/return ports on the motor unit (or use a plastic throw-away plug for the return port to make it more obvious).
- Some clarification of the compressor requirement; I’m reading the manual as stating a compressor capable of flowing 5 CFM @ 70-90 psi is required – that’s way more than this lift needs.
- The manual specifies 12 qts of hydraulic fluid/ATF. With 12 qts loaded into the pump reservoir, the piston bled, and the lift in the fully lowered position the “dipstick” reads zero – in fact, it doesn’t even register on the gauge at all. 12 qts is enough to bleed the piston and bring it up to the highest position but there likely isn’t much margin. I still need to run down to the auto parts store and pick up enough ATF to bring the reservoir up to the full mark. In fairness, there is verbiage in the manual which states to bring it to the correct fluid level with the lift fully lowered – however, it’s definitely more than 12 qts! – UPDATE: it took an additional 4.5 qts to get to just below the MAX fill line with the lift in the fully down position.
- Nitpicky – more washers. Some fasteners didn’t include washers but I like to use washers on the bolt head and nut side in just about all cases. It’s better for load distribution and to prevent marring. The fasteners which didn’t include washers were non-load bearing so not having a washer really doesn’t matter. If you’ve been following along you already know I have OCD for certain things, washers falling into that category.
Final thoughts:
If I had to do it again, I would most definitely still choose to assemble my own lift. I had inquired with a local distributor; given the process and knowledge involved in assembling this 4-post, their out-the-door installed price was a bargain at only a few hundred dollars for labor. However, doing this myself really forced me to take a close look at all the components and evaluate how they were designed, how each works, and how they all work together as a system. Having done so, I am now much more confident in how to properly use and maintain this lift. I was already sold on the quality of BendPak based on my experience with the QuickJack and on reputation. I’m happy to say my initial use and review of the HD-9 lift system doesn’t disappoint. I look forward to many years of safe and reliable service.
Some parting shots:


Thanks again to the folks at BendPak!
